


My crafty sister-in-law Elise has made a few of these beautiful ribbon necklaces for Clare, who just adores them. And I adore them so much that I’ve even considered stealing the brown one! Since I’m on my way out of town on a road trip to Austin, I asked her to share the details with all of us. Isn’t she nice? Find Elise’s DIY Ribbon Necklaces after the jump.
What you’ll need:

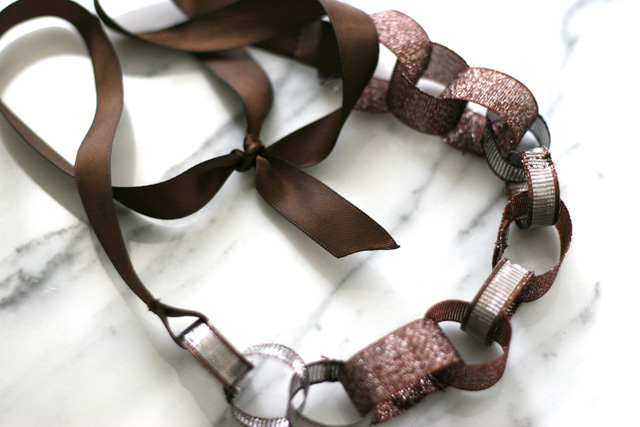
• Various ribbon. I picked up these sets of 6 from the dollar bin at Target. I used the solid ribbon (from Michael’s discount bin) for the ties.
• Sewing machine (I tried one of these hand-sewed, but it fell apart pretty rapidly. Not up to snuff for child-wearing. Maybe if you’re skills are much better than mine.)
• A lighter or candle (this part is optional, but I found that it really helps) Editors note: Use fire at your own risk and PLEASE PLEASE PLEASE be careful with open flames in a house with kiddos!
Note: the pictures are just basting stitches, since my machine is at the Bernina Store getting repaired.
What to do:
1. Cut your ribbon into stripes approx. 4 inches long. (You want to have plenty of maneuvering room.)
2. With right sides together, sew up and back. I used about a 1/4″ seam. My fingers got a little fumbly with anything smaller 🙂

3. Melt the ends of the ribbon in the candle or lighter. Before it completely cools, press the seam to one side, effectively sealing the ribbon. Turn your loop right-side-to.


4. Thread your next piece of ribbon through your loop, right sides together. Stitch, seal, flip.
Remember to link each new piece through your previous loop. The first time, I ended up with a bunch of unconnected loops because I wasn’t thinking. Oops!

5. Once you feel like your string of loops is long enough (I used all the ribbon), cut two lengths of your solid-color ribbon. Mine were about 18″, but it could be shorter or longer based on how long you want your necklace. You want enough length to tie a bow.
6. Seal off both ends of your ribbon with your candle.
7. Loop the ribbon through one end of your necklace and stitch. Repeat with the other length of ribbon on the other end of your necklace.

8. Tie ends in a pretty bow. Ta-da! You’re done.

Thanks Elise! I hope this doesn’t mean that you want us to make our own necklaces from here on out. HA!
This is really cute for a little girl!
what a cute idea!
super cute!!! would be a fun garland too
Love it! And I don't even have daughters. I'm trying to think of a way to make a grown-up version of this. Or, heck, I'll just make it like this and wear it anyway!
Excellent tutorial, thanks so much for sharing! I know our readers over at CraftGossip will love it, so I am posting a link to it later this week. THanks again!
Nice design!
Thank You SO Much for this! Yes, I know I'm a little slow on getting this out, but I'm making some for my friend's little girl. She had lead poisoning when she was a baby and now she has a laundry list of items she can't have, and one is jewelry. But she's such a princess, it made me so sad to see her unable to have a necklace, and now I'm going to make her a bunch and send them out. She's going to be SO excited.
I love this…made one for my 16 mo old the other day…except used a glue gun instead of sewing each loop…thanks!!
See pics here:
http://jamesandcalista.blogspot.com/2010/09/more-crafting.html
Thanks for sharing! I am a crafter myself and I would love to feature your design at
http://www.handmade-jewelry-club.com/
Would this be okay with you?
Thanks!
diylessonsassistant
http://diylessons.org/
Thanks for your interest in our DIY project. Please feel free to repost one of the photos (and a project description) with a link to the DIY on Prudentbaby.com. Thank you for asking!
Couldn't wait to try this when I found it, have posted my effort here http://ontopofalilypad.blogspot.com/2011/02/my-creative-space-easy-ribbon-necklace.html
We have featured your designs at http://www.handmade-jewelry-club.com/2011/03/variety-of-tutorials-for-kids-and.html
Take a look. Do let your readers know that you have been featured ya! Thanks!
Jane
http://diylessons.org/
http://www.handmade-jewelry-club.com/