


My little baby Clare is off to pre-school this Fall and now she will be all ready with a brand new mommy-made DIY nap mat.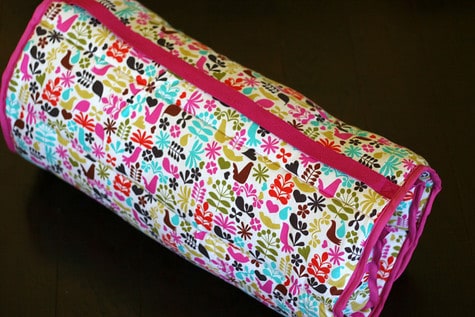
But will I be ready? I’m already making up excuses for why she should maybe stay home. I’m out of my mind, right? Anyway, DIY nap mat, so cozy, want one for me, for napping, while daughter is at school. Ok, I’m back on board.
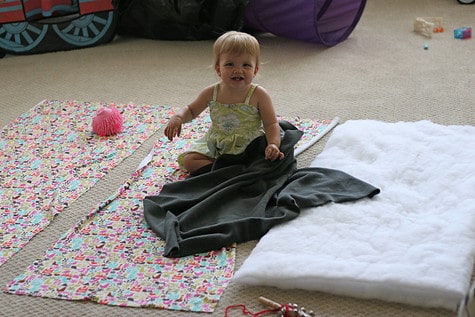
Gather your materials!
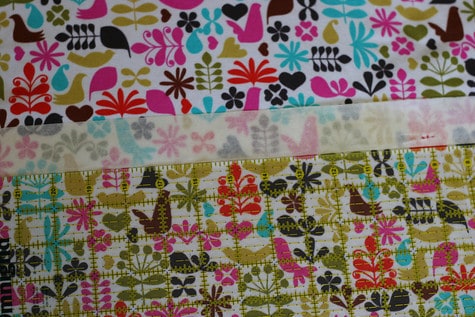
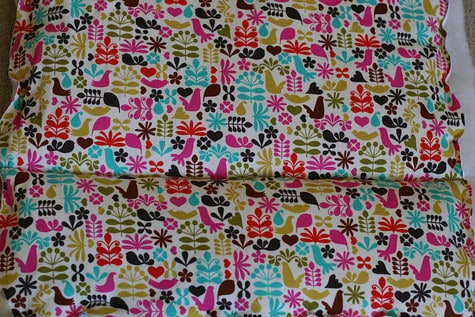
– 2 yards pre-washed fabric for DIY Nap Mat. You want to end up with 2 – 2′ x 6′ pieces. I used Patty Young Knits for Michael Miller in Scandi Chirp which was wider than quilting cotton so I was able to just fold it in half. If you use quilting cotton you may need 4 yards, 2 yards for each side.
I was a little worried about using a knit for this but it ended up being sewing perfection! You can also use corduroy etc.
– 36″ x 40″ of pre-washed fleece (or similar blanket-like fabric) Both sides will show.
– 9 yards – 1/2″ double fold bias tape.
– Quilt Batting-mid-loft. I used a queen-size that folded nicely to 6 layers of 2’x5′. This seemed to be the max my machine would handle but still enough cushion.
– 2 – 1’x2′ pre-washed muslin or cotton for pillow insert. (I like to use inexpensive sheets for this.)
– Poly-fill for pillow stuffing
– 32″ – 1 1/2″ Belting/Webbing. I used cotton but poly would work.
– 3″ – 1″ wide velcro
– Masking tape
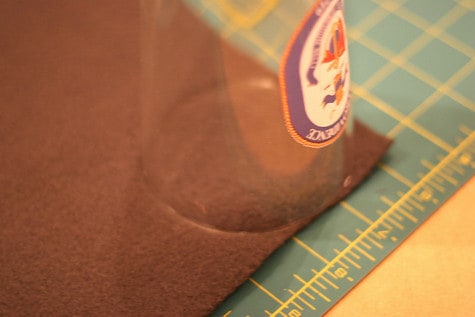
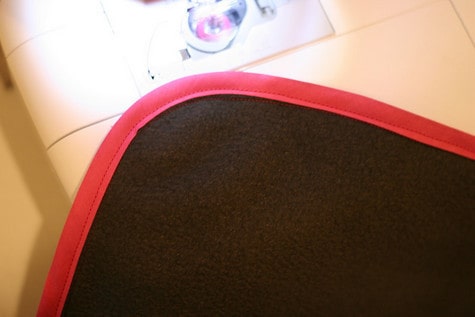
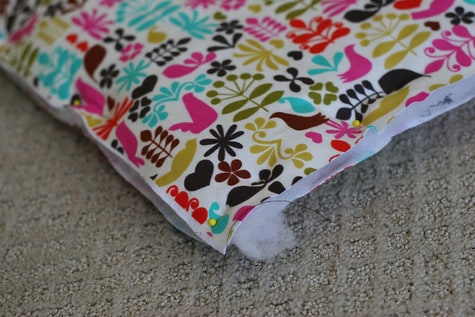
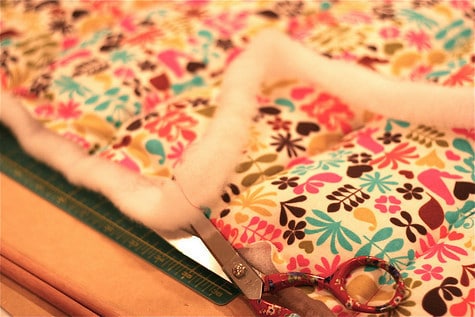
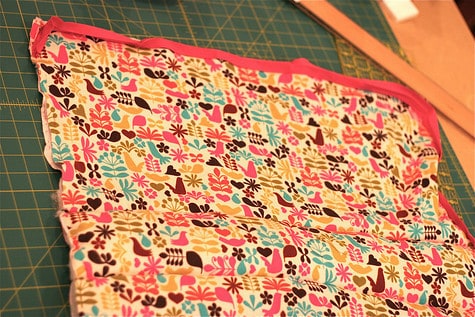
1. With your blanket fleece vertical, round the top right and bottom right corners.

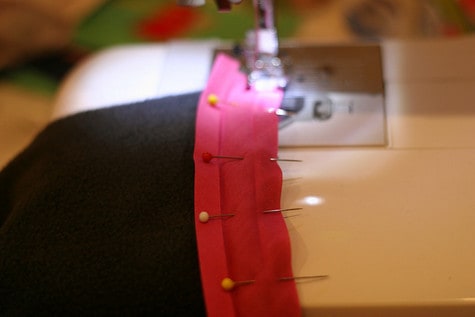
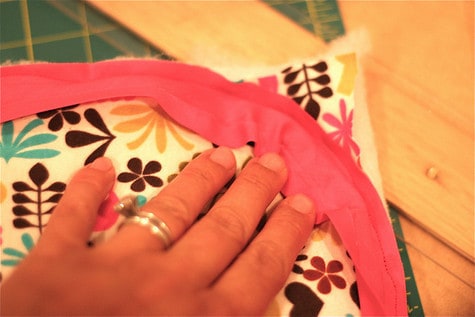
2. Starting on the top left corner of your blanket fleece, start pinning the wider edge of the open bias tape to the fabric with the outside edges aligned. I know my pins are backwards, I’m a lefty. : ) Apply bias tape to the top, right and bottom of the blanket. The left side is left unfinished.
3. Sew all the way around the 3 bias taped sides of blanket, just to the outside of the outer crease.
4. Fold Bias tape up over edge and (on “back” side) sew through all layers, just inside the edge.
Set blanket aside.
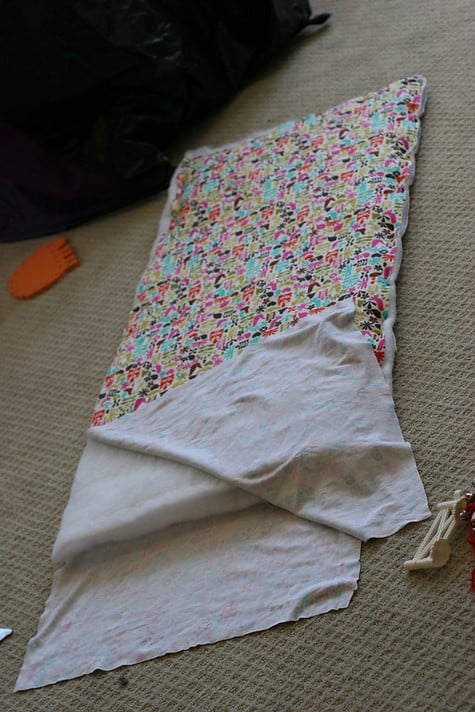
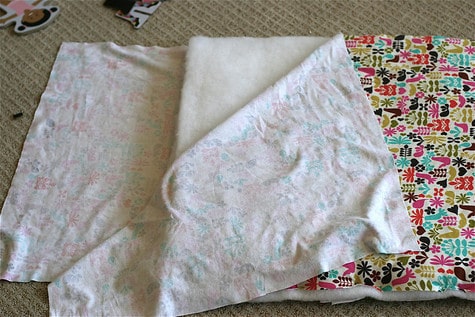
5. Lay one layer of your mat fabric right-side down. Position the batting on top with left, right and bottom aligned with fabric. It’s ok if your batting is a little larger than your fabric, but it shouldn’t be smaller. Lay your top fabric on top right-side-up. Your pillow will end up where there is no batting (see below.) Make sure your fabric pattern is facing the correct way, top and bottom.
6. Pin through all layers, all the way around edge.
7. Measure 8″ from the bottom on left and right side and mark at the very edge.
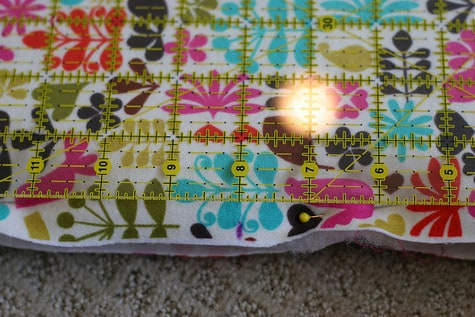
8. Using a ruler, tape from one mark straight across to the other side.
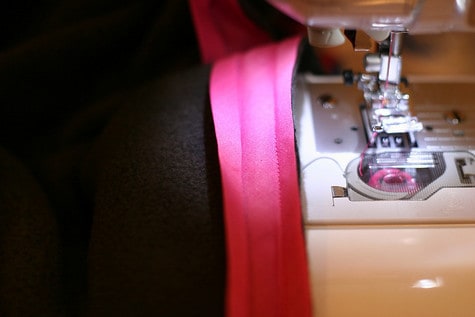
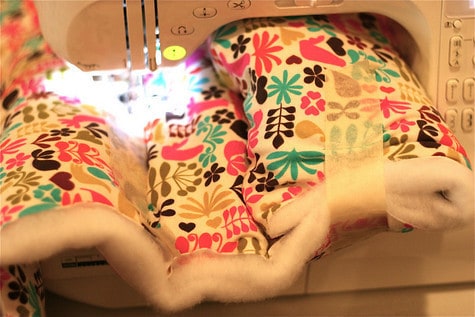
9. Now for the true test of your sewing machine. Sew a straight stitch along the edge of the tape at your marks. I used my machines longest stitch (5). I won’t lie, this was pretty cumbersome and my fabric pinched a few times but the knit fabric and the busy pattern were so forgiving that I just went with it.

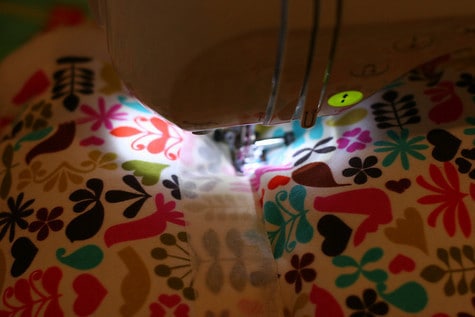
10. Now measure 5″ up each side from the line you just sewed, mark, tape and sew. Repeat as many times as needed to get approximately 10-12″ from the top, or end just before you hit the end of your batting. If you need to make your last row a bit shorter or taller, no one will notice.
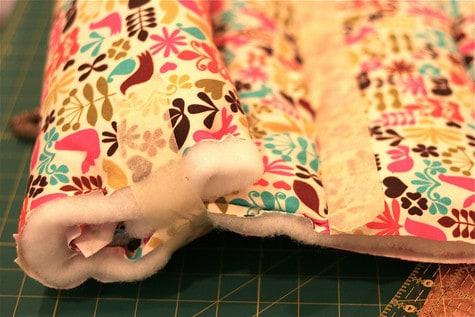
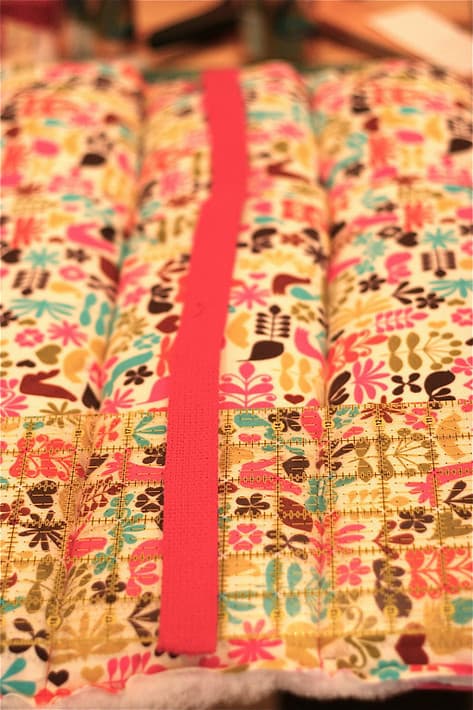
Tip: When you get a few rows in, the amount of fabric that needs to fit under the arm of your sewing machine is cumbersome. I rolled it up tightly as shown below and it helped immensely.
11. Now you are left with 2 flaps of fabric at the top. (Ignore that my fabric pattern is upside-down. I’m a pregnant dummy. Your fabric pattern should be right-side-up.) Measure the height and width of the flaps from left to right and top to bottom(the first stitched line.) Mine was 24″ wide by 11″ tall. Add 1/2″ to both measurements.
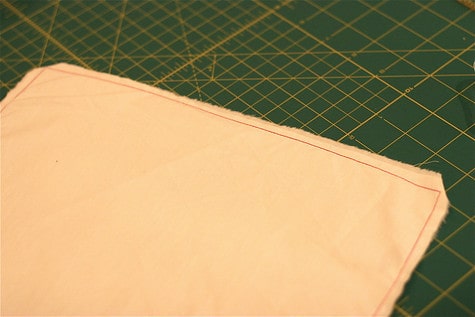
12. Now we are going to make a really down-n-dirty pillow insert. Cut 2 rectangles of basic muslin to the size above, so mine was 24.5″ x 11.5″. Pin together.
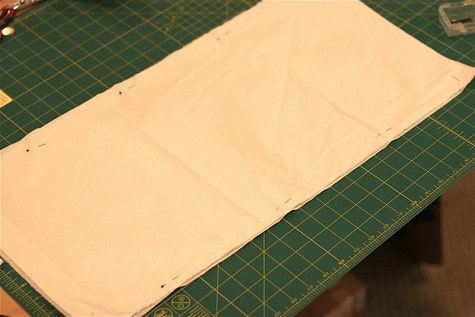
13. Sew all the way around with 1/4″ seam, leaving an opening for turning and stuffing. Snip your corners.
14. Turn inside out and stuff firmly. Pin your opening (you can turn it in and make a neat closure but it will be completely hidden so it doesn’t really matter.)
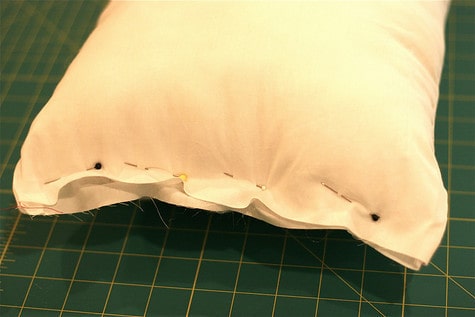
15. Sew opening closed.
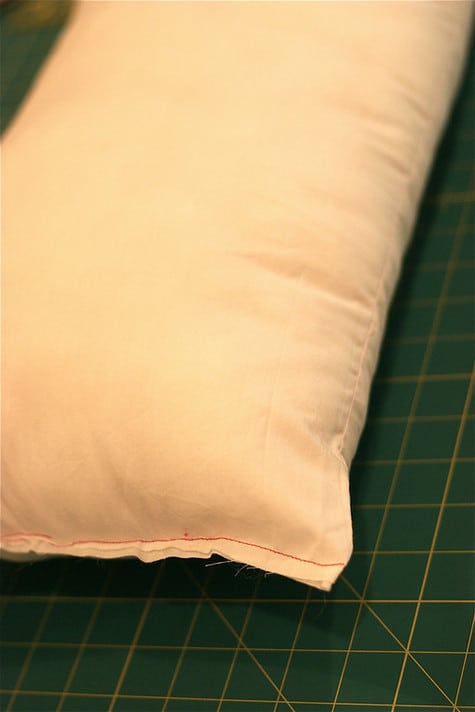
Set pillow insert aside.
16. Now is a good time to trim up the stuffing even with the fabric edge.
Now we are going to add a shoulder strap.
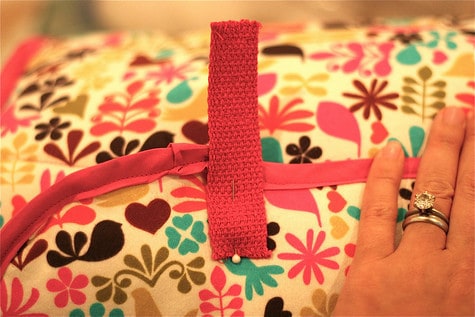
17. Cut a length of webbing/belting the width of your mat. 24″ in my case.
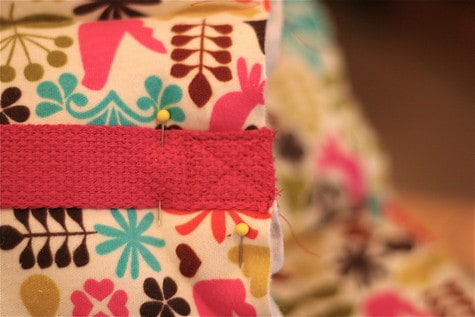
18. Finish the raw ends of your webbing by stitching a tight zig-zag along each end of the strap with one side of the stitch hitting over the edge of the fabric. Or an overlock stitch.

19. Decide which side is the outside of your mat. It won’t really matter unless you have just realized that one side of your fabric is upside-down. Measure 15 inches up from bottom and pin strap to the very edge on both sides.
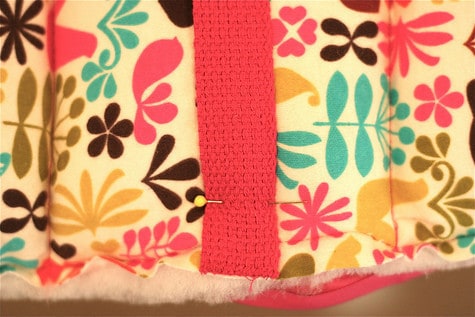
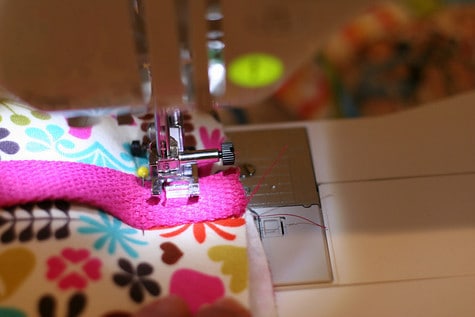
20. Through all layers, sew a square with an x in the middle, a typical reinforced strap stitch (is there a technical term for this?) Add a few backward stitches at the beginning and end to secure.
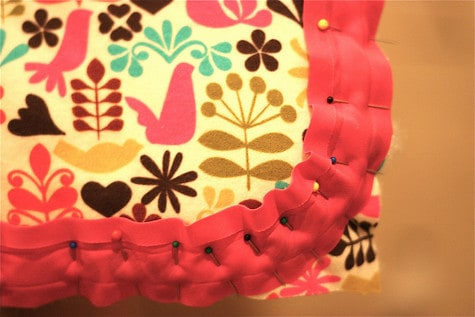
21. Starting on the front of the mat, begin pinning the bias tape just before the top left corner. The opening right below the start of the bias tape will be where you insert the pillow later.
You want to add a little tuck like this at the beginning.
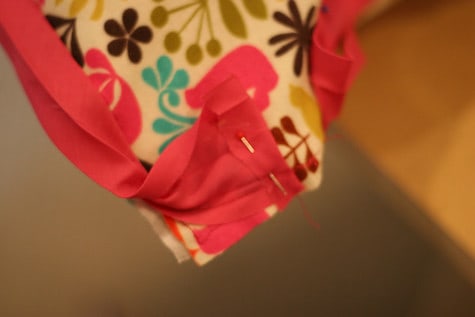
22. Continue to pin along top, down right side and across bottom. Again, my pins point out because I’m a lefty.
23. For the corners, just turn the bias tape, leaving a rounded corner, you will trim the excess fabric later.
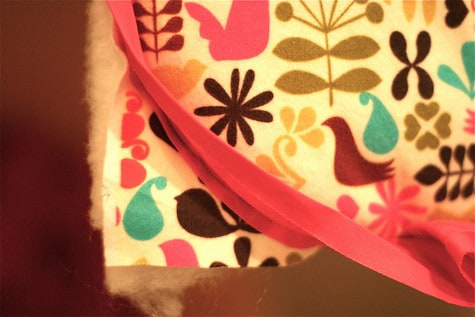
24. Just after you turn the bottom left corner, you want to add your blanket. Align the left (unfinished) edge of your blanket with the left side of your mat. The top of the blanket should hit just under the pillow pocket and the bottom edge of the blanket should be at least a few inches above the bottom edge of the mat. The blanket will be much wider than the mat.
Note: You can also see when I had to add a new strip of bias tape along the bottom edge. I used a french seam “fold” to “hook” the ends into each other. This is a picture from later in the project, don’t be confused by the lack of pins and the trimmed corner.
25. Continue pinning the bias tape until you hit opening for the the pillow. Insert pillow.

26. Continue pinning bias tape, closing pillow area. When you reach the start of the bias tape. “Hook” ends of bias tape into each other with another French seam “fold.”
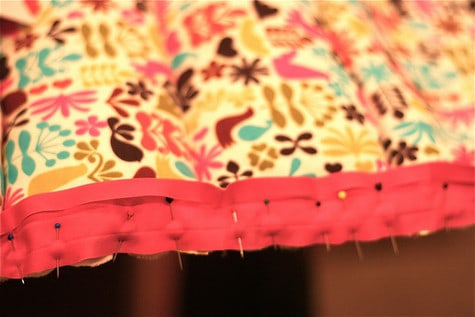
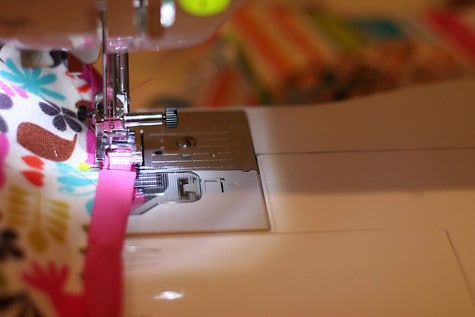
27. Start sewing the bias tape. Keep checking that you have all of your layers aligned and that you are sewing through them all. You want to sew just outside the outer fold of the bias tape. Sew all the way around edge.
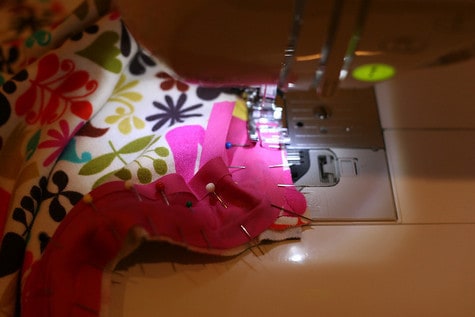
It will look like this, except your stitches wont be all wonky. Check under the bias tape all the way around and make sure you didn’t miss the fabric anywhere. If you did, just sew over that section a little deeper into the bias tape.
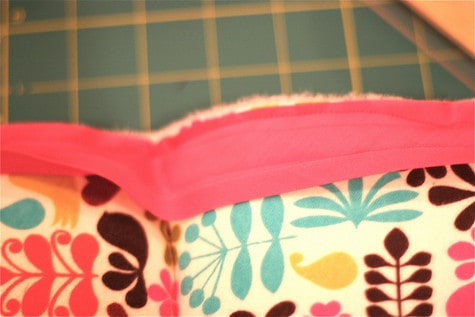
28. Trim any edges even with the outer edge of the bias tape.
Like this.
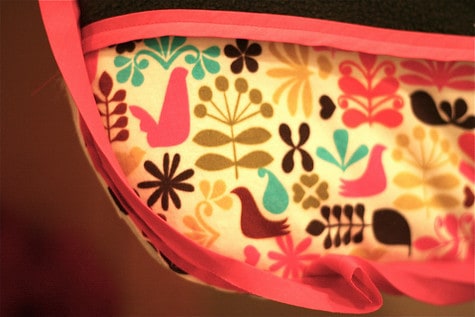
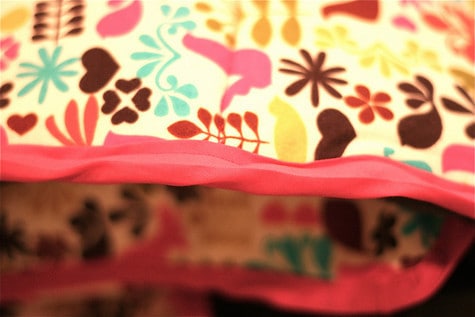
29. Now wrap the bias tape around the edge of your mat. You can pin if you like but I found it easier not to pin so that I could keep checking that all layers were being sewn in.
30. Ideally you want to keep your bias tape flat and stitch through all layers but you might have to be flexible here and let the folds open a little to accommodate the girth of the edge. It is MORE important that all layers get securely sewn into the bias tape then keeping the bias tape flat.
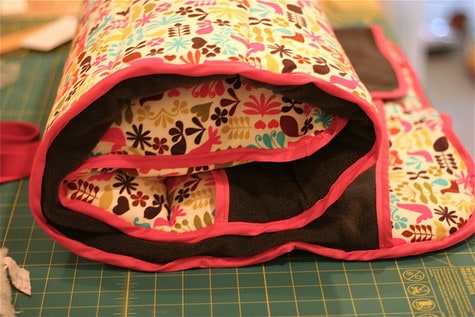
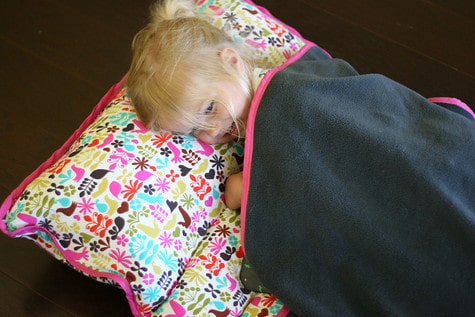
You are seriously almost done! Your mat will look something like this rolled up. We just need to add Velcro closures.
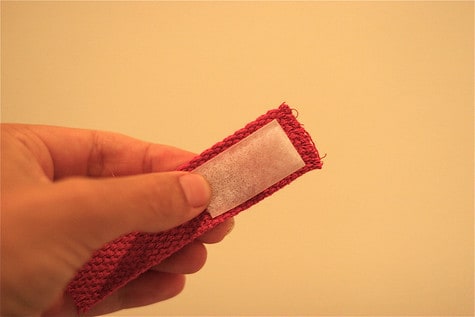
31. Cut 2 – 4″ lengths of webbing/belting. Finish ends the same as the strap above.
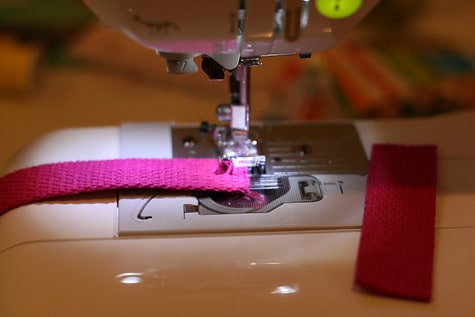
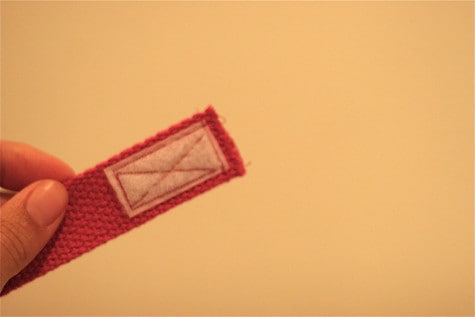
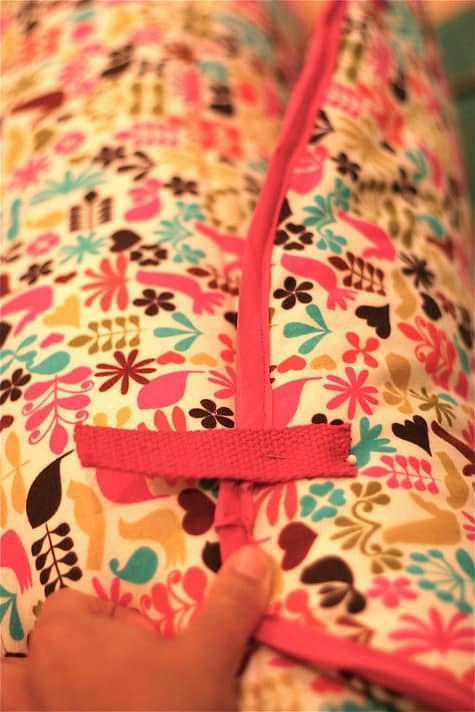
32. Sew 1 1/2″ of Velcro (fuzzy loops) to under side of strap as shown. Repeat for 2nd strap.
33. Pin other end of strap (5″ in from side and 2″ in from bottom) at the bottom of your mat. Repeat on other side.
34. Roll mat and position other side of Velcro (scratchy hooks) on mat and pin.
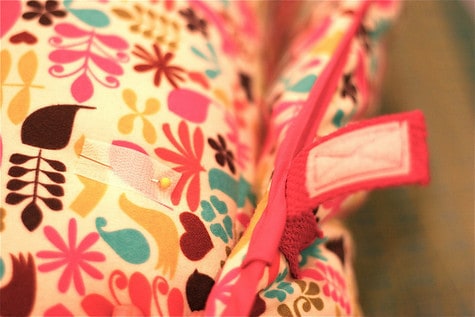
35. Sew straps to mat using the same formation as the shoulder strap. For the other side, I hand-sewed them to the mat, going through only the top layer, using many small tight stitches.

And you are done with your DIY Nap Mat! Snuggle up my friend! I think I will add a cute applique to the blanket, maybe pick up one of the sweet shapes from the fabric or do her name so none of those 3 year old hoodlums walks off with my masterpiece!
Now that you know how to make a DIY Nap Mat, check out some of our other sewing tutorials or toy tutorials. Learn How to Make a Crayon Roll or a Crayon Apron or make a DIY nap mat for a doll.
Follow us on Pinterest for more fun sewing tutorials!
That is fantastic!!! I love it… if I had one I'd make sure *I* got a nap every day! 🙂
modelmumma.blogspot.com
this is so cute! I really need to get a sewing machine!
that is darlin'!!! what a creative mama – that's not something i think i could tackle without a lot of potty talk!
So cute! Will try to make one for my Pre-Ker. I love the fabric too!
Amy
O, Jacinda! How can I love you and hate you at the same time?? 😉 My lil Darcy just got the "White trash BBQ" version of this nap roll … I bought a micro plush blanket, folded it in half, sewed across 6 inches from top and stuffed with batting. Then I cut a yoga mat to size and put it in the bottom. I sewed two *receiving blankets* together for the blanket and sewed it to the side. I'm soooooo glad our girls aren't in the same class! You're amazingness puts me to shame!
Thanks for this! I am just getting to make one for Ethan for his MDO school! Yours looks so easy.
This is GREAT! Especially for a little one going off to school (or pre-school) for the first time – a bit of snuggly mama-made goodness for their time away.
I linked to your tutorial over at Craft Gossip Sewing:
http://sewing.craftgossip.com/tutorial-diy-naptime-roll-with-built-in-pillow/2010/08/05/
–Anne
Thank you!!! I have been looking for a DIY for a nap mat. My very talented mother made one for my son last year but this year, I want to do it!! She put velcro up the sides to allow the travel pillow and the mat to come out and wash the cover weekly. Our school requires weekly washing and by the end of last year that velcro had gotten pretty worn out. Could you throw this whole thing in the washer?
This is so freaking cute!!!
Adorable! This would be excellent for sleepovers.
Super cute! I am going to try and make one for my niece to take to school with her! Thanks for the instructions!
My little one needs a nap mat for Kindergarten. I plan to find out if this kind is acceptable (the fold up mats for sale in stores seem so… not rest inducing).
It looks like a simpler project than I feared it would be.
This is fantastic! You are my hero! My daughter needs one for the first time too & I've been putting off buying it; likely because I can't believe she's old enough to need one! I love the material you chose. I think I'll be sharing a link to this soon on detailgalblog.com
This is awesome. I am so going to make one for my little guy! Or at least I will try. Thanks for the directions.
so cute!!
This is wonderful! I've been thinking about getting my daughter one for daycare. Now I have incentive to MAKE her one! Thanks!
I hope I can make this with my limited/beginner sewing skills. Thanks to your incredibly detailed tutorial, I think I'll have no problems following along. I'll be sure to share what I've done when I'm finished (in about 50 years!) =)
~Rebecca
Oh my gosh!! So cute!
this is awesome..such a great idea!!
Wow! The nap mat is awesome. I would love to make one for my daughter, who is 8 months old. Maybe by the time she is 3 and off to preschool, my sewing skills will be a level that I could actually pull off what you just made, and without hyperventilating!
I love this! It's so pretty and functional!
I agree i need one of these too LOL This is great. Yours turned our soo pretty 🙂 Great job 🙂
AMAZING! Scarlet starts big girl school on monday, i will have to whip one out this weekend!!
Having 4 kids 4 and under, nap time can be a battle, this just may be the little trick I need to get them excited to "sleep" in it! What a fantastic Idea! your amazing!
this is awesome!!! Great fabric choise by the way!
OMG this is amazing!!!!! I've never been a very good sewer…. I'm thinking Nana might need to make one of these for my little one!!!
Thank you so much for sharing all of your wonderful ideas!!
Fantastic! I'm just getting ready to send my second off to pre-school….like another reader my first got the "White Trash BBQ" version..
Would love to make this, how well do you think it will hold up to a weekly washing.
You are brilliant. And it turned out so cute. congrats!
finally someone who shows "left hand" pinning, sewing, etc. Nice clear instructions, and a real cute mat. Got 6 grandkid; one greatgrand son who is going to be very happy. Thank you. Barbara sprague
You better watch out- all those other moms and kids will be begging you to make them one! LOVE the fabric!
Same question as some of the others- what do you think about washing it??
This is a really cute idea!! I love the print you choose too 🙂
Adorable! My little gal is 10 months old, so I'm hoping if I start now, it'll be ready by the time she's going off to preschool, or kinder! :0)
This pattern is linked on the new sewing community: mysewingcircle.com
Thank you so much for offering such a great pattern.
So great..she will love it (and school).
FABULOUS tutorial!!! My three girls will gobble these up!
For the ladies asking about washability. I would say that if you pre-wash all your material and batting and have good secure stitching, the mat should hold up to washing just fine. If you plan to wash your mat weekly, you might want to consider a style (velcro/buttons) where the pillow insert can slide out for easier drying. I haven't tried washing mine yet but plan to do so in a cold delicate cycle and low-heat tumble dry.
How cute.. I love this!! I really wanna make this but looks a little hard for me. But one of theese days i think I might just give it a try anyways!
This is such a great idea! I'm certainly bookmarking it for later use 🙂
Love the fabric choice and the instructions! This is definitely going in my idea file. 🙂
I love it! Have you ever thought of making a sleeping bag in the same way? My 3-year-old is enamored with sleeping bags, and I've been thinking about homemaking her one.
Awesome idea and tutorial! While my little guys are only in AM preschool, I think I'll make them each one for at home on movie nights, to take to nanaws and for camping. It turned out wonderful!
That is one of the cutest, original things I have seen in Blogland lately. I am thinking it would be a perfect gift for my toddler come this Christmas. Thanks for sharing!
Great tutorial! I so could have used this a few days ago when I was making cushions for a rocking chair. Bias tape has seemed so intimidating until I read your tutorial. Now I'm thinking it would have been so much easier than my approach-oh well, I'm hanging onto this for next time. You live you learn, right?
can I make this mommy sized?? I so freaking love this! and it definitely seems like something even I could sew
What a great idea! You did a really nice job.
This is amazing. A very detailed tutorial. Thank you
Jacinda,
I was going to suggest adding a zipper to the side of the pillow insert to enhance washability. It could either be placed right in the seam with an invisible zipper, or turn the closure around to the back and add a regular zipper so that the little on isn't laying directly on it.
i'm gonna make one of these! gorgeous.
SOOOO cute! For like 2 seconds I wish my daughter was heading to big girl school so that I can make one. I will certainly be saving this one for later!
Oh my, this truly is AWESOME!! Thank you so much for the great pictures, fly tutorial, and the and amazing inspiration! 🙂
Oh my goodness, that is amazing! I'm getting a cozy, sleepy feeling just looking at the completed project. (Then again, I do have a six month old baby. Doesn't take much for me to have a sleepy feeling.) Seriously, super cute!
Oh, my goodness! This is so cute! I really need to make one for my 3 year old for his CDO class… not quite sure if I have your patience & skills though.
Where do you find such cute fabric??
nevermind I just saw!
This is absolutely brillant! I had made my son a nap mat last year for kindergarten. I had used another tutorial as a basic guideline. It had recommended using foam and I only had batting on hand. I struggled with getting equal measurements with the batting…and your masking tape idea is truly brillant!! I had used piping, but love the concept of bias tape -it just makes things so much easier! I will definitely be implementing some of these techniques for my daughter's future nap mat!
I LOVE this idea. I have one going to kindergarten and one still home, so I could definitely use 2 of these. Off to JoAnn's I go!
Wow this is gorgeous! I wish I had have seen this before my three went to preschool. It will make a really great gift for my nephew and niece though! Thanks so much for sharing this.
I REALLY love the fabric you used as well. Might have to buy some…yes really I think I need to. 😉
This is amazing!!! I can't get enough of your site! I just wish France had as much fun material as you all have in the states. I suffering from some serious withdrawals. Thanks for your dedication to this site.
your girl will have a great time at school with this mammy-made bedroll; it's the perfect combination for going into the big world…
this is amazing!!! I am making one for my little boys!
This is completely amazing. I'm totally intimidated, but amazing!
This is perfectly adorable. Not much of a sewer, but I would love to make something like this for my DD to take to preschool.
OMG! I love this! I love the fabric too. Your instructions are so clear and easy to follow! I'm not a great sewer but I think I can do this. I can't wait to try it out. Thanks!
Wow, this is incredible! Thanks goodness I still have a few years before I need to whip one of these babies up!
This is so freakin cute!!!! This is the project that is going to make me learn how to use my sewing machine! I LOVE IT!!!!
You have just inspired me to get a new sewing machine!!! Love it!
I would love to have one of these for my new little one that will be here in about 2 weeks. It would work great for nap time.
Melissa B.
mbabecka@gmail.com
I really want to try and make this! sarahham3@aol.com
Thank you for the great tutorial!
I am linking your tutorial over at http://www.sewspoiled.blogspot.com!
love this idea and am hoping to make one for my little guy since I think the little mat and recieving blanket that he sleeps on at school could use some help- but my question is- can I toss the end product in the wash at the end of each week? Or would it ruin the mat part of the mat?
thanks!
never mind- I saw your answer to this question up above (should have read thru before posting!) I will give this a shot and cross my fingers that it holds up thru lots of nap times 🙂
How adorable!
I would have loved loved loved this tutorial before I had to buy the hideous, scratchy, polyester mess from the daycare!
This is a great tutorial! My little pre-schooler won't be napping at school, but if she had a mat like that, she might! Maybe she'll want one at home…
Featured this on my blog. Great tutorial!
http://urban-domestic.blogspot.com/2010/08/diy-nap-matbed-roll.html
Thanks A LOT! (sarcasm altert) as if I wasn't busy enough already I had to stumble across this ADORABLE project and now try and whip one out by Saturday for my sisters baby shower! *sigh*
I absolutely love this and just added to the list of things I need to make and pawn off onto my friends who have kids. 🙂
That is so cute! You better watch out though you may be making them for the whole class!
What a GREAT tutorial & gift idea – love the fabric! My munchkin isn't in preschool yet, but this is so going on my to-sew list!
I'd never even HEARD of one of these until last week when I was told my child must have one. This tutorial is GORGEOUS. Thank you thank you!
For a beginner, I did pretty well. My goal: actually complete this puppy, no matter how many mistakes and uneven corners. I'm almost done! And yes, there is an uneven corner!
This is so cool! You are a legend! Thanks so much for sharing the tutorial!
Arabella
I've been eyeballing this ever since you posted it, and have FINALLY just made one for my son. He LOVES it! Thank you so so much!
http://www.flickr.com/photos/47253078@N04/4953427228/
So cute! I'm going to make this tonight as my nightly project. 🙂
question!! what type of thread and fabric do you reccomend? fabric that i get consistantly unravels and is just super thin and i hate it even more when it looks awesome at the store and i get home wash it and it becomes colorless!! and the thread i use is always breaking. always. heeelllppp mee please.
Hi Dakota-Wow, I've never really had those issues! We get most of our fabric from Fabricworm.com. I'd just look for nice quality cotton quilting fabric and only wash it at the temp you would wash the final piece. As for thread, I like Coats.com for an affordable yet functional brand. It's always worked for me.
I have been looking for a nat mat pattern for a while, yours is the best. I love the step by step pictures. I already created a nap mat using a different steps but I definetely use yours on my next one.
hm. this looks difficult. my sister asked me today if i could make a nap mat for her son. i would prefer she buy the walmart mat…
on a side note, holy diamond ring, batman!
Yay! I made one of these and featured it on my blog.
Check it out – I am so happy with how it came together.
This is AWSOME!!! I want to make these as Christmas gifts for the little one in my family.
just finished mine! love it! yay!
you are so blooming clever!
I just love this! Do you know about how much it cost you to make it??
Hi Victoria! I had all of my materials on hand so I'm not really sure. You could use a recycled blanket for your fabric and make your bias tape, which would leave you with the batting as your big expense. The range could be anywhere from $10 to $40 depending on materials/resourcefulness. I do know that nice mats sell for $50-60 so it's a bargain to make it regardless!
I love your step by step tutorial since I'm a visual person and reading about it just doesn't seem to get me as inspired as this, thank you so much :))))
Awesome tutorial and advice on how to put it together. Just finished a sleeping mat+comforter for my 6m old son – used your idea, but instead of a blanket, I made him a comforter, and used a thin filling for the back. Needed something he could sleep in, as he's outgrowing sleep sacks, and kicks off all blankets. Thank you for the inspiration!
I am so thankful you posted this!!!! I have a class full of twos that will be getting these wonderful gifts! You were so informative and the step by step photos are awesome. Thanks again!
That's fabulous!
Can I have one in an adult size 🙂
So cute! You make it look easy!
Thank you so much for posting this! I also have a little one heading off to preschool in the fall and this is perfect!
Thanks for posting this but I wanted to suggest clarifying you need TWO pieces of 2 yards of fabric for the mat. Just went and bought a yard for each side and got home and it dawned on me that is NOT enough. LOL Kinda irritating BUT oh, well. Shake it off. It happens!! But just so no one else makes this ridiculous/money and time wasting mistake! LOL
Maravilhoso, obrigada por compartilhar!
Beijos
Hey Katelyn- sorry that was confusing. I re-wrote to clarify. Depending on the width of your 2 yds fabric, you are supposed to fold it in half the long way for the front and back. But this project is also really great for patching fabric together. Just sew pieces together and hide the seams later when you quilt it!
Thanks for all the great pictures – can't wait to give this a try. Love your blog, just found it through a pin on pinterest.
Wowww! This is fantastic, thanks for sharing and for all the pictures!!!
I love your blog!!!
I decided to make this mat for my youngest because it seemed easier than another tutorial I used for my oldest. Unfortunately, I am in the middle of making it and have come across several issues. First off, I washed my quilt batting because the directions called for pre-washed. I guess I misunderstood because I ruined the first package. Right now, I'm trying to figure out the size of the batting in the mat. I had to buy a full size because a twin size was not available. I'll be doing good to get four layers out of it. Also,your measurements call for the napmat to be 2.5 feet wide and the batting to be 2 feet wide, yet your pictures show that they line up on the edges. I would appreciate any help because as of right now, I am very disapponted.
HI MRSTOLLI-
I made some tweaks right in the post to address your questions but basically… make the mat whatever width you wish, make the batting the same width. 2' works! The batting doesn't need to be washed, and I say use as many layers as your sewing machine can handle for comfy plushness. Good luck and I hope this helps!! xoxo
i love this. my munchkin isn't big enough for pre-k but love the idea for naps on trips. i think i will nix the carry strap though and for go velcro for elastic bands to wrap around instead.
I was so confused! I was having the same issues as MrStolli (except I didn't ruin my batting) — trying to make a TWIN-size batting into 6 layers 2'x5' just wasn't working! I can get 3 layers of 2.5', which is what my cover fabric is, and hope it will be plush enough. Wish I hadn't printed the directions before they were rewritten!
I featured this post on my blog today:
Food and Games To-Go (Road Trips with Little Ones)
Feel free to promote to your friends and fans, too!
Thanks Prudent Mamas!! I knew what I wanted to make, but was having a tough time piecing it together. Your instructions and photos were fantastic! I added cutouts from a few of my daughter's old t-shirts to the inside of the roll and made an envelope for the pillow on top so that the pillow isn't subjected to the weekly washings required by daycare. For you other nap-mat-makers, I only used two layers of quilt batting, and it's perfectly comfy to lay on top of the plastic mats that they use at my daughter's daycare.
Quick question – does the bias tape need to go over all the layers of batting? or just around the top & bottom fabric?
Hi Kate, whichever is easier. For mine, The bias tape was sewn through all layers where the batting was sewn to the top and bottom fabric (ie the quilting lines) otherwise just the top and bottom fabric, make sense? But it doesn't really matter. Whatever works!
[…] Lounge Mat- How great would these be for sleep overs, movie nights or for taking to preschool for nap? I need to make one! You can find the directions HERE. […]
I’m obviously a little behind finding this blog (what a wonderful thing about blogs!! No flipping through old magazines!!) HOWEVER, my son starts kindergarten this fall and I’m putting this on the “priority” list of things to make him!!
[…] DIY NapMat/BedRoll-Prudent Baby […]
[…] mat for rest time, rather than a cot. Please see the following link for an example (similar to http://prudentbaby.com/2010/08/baby-kid/diy-nap-matbed-roll-2/). We need volunteers to sew the nap mats, and they can be completed over the summer in your own […]
I know I am late on posting about this—but am I correct in understanding the length of this after you make it is around 6 feet long? (a little shorter because of seams?)
Thanks! Love this, making it soon I hope! All of a sudden I feel like my son cannot live without it.
Do you sell these nap mats? If so, what is the cost? Love them and want them for my twins!
Just out of curiosity…what size is the finished mat approximately?
I love this- My daughter is starting school in a few weeks and honestly- we hadn’t even thought about supplies like this! This is perfect because I have everything for it already! Thank you so much for sharing.
I’m glad to see someone asking about the finished length. It does sound like close to 6′ and that seems way too big for a K or Pre-K little one. I need to make two, and these are some of the clearest directions I’ve seen, but am hoping for an answer on the size before I get started. Thanks for the clear directions and great illustrations.
I made one of these for my son last year, and I am amazed by how well it turned out and even more amazed by how well it held up to weekly (and sometimes even more frequent) washes. My son is a lot longer now than he was last summer, so I’m going to donate his old nap mat to the daycare and begin work on his new one. Thank you SO much for posting this tutorial!
[…] DIY Nap Mat / Bedroll by Prudent Baby This is such a fantastic idea – an all-in-one pillow and mat for nap time at pre-school! […]
You are soooo sweet to share your great nap mat with all of us. Thank you for being so clear with great pics. You are the best!!!!!Judie
Thank you so much for the wonderful tutorial. I will be making one of these for my daughter next week.
I also used your hooded towel tutorial and they turned out wonderfully! Really adorable.
I managed to score the same Patty Young fabric that you used here, which I absolutely love, but I was wondering what colour bias tape you used. Is it bright pink or Berry sorbet? Also, the fleece cover is black or brown?
Thank you so much….and I am also enjoying your posts on Facebook.
Cheers.
Hint: If you’re having trouble catching all of the layers of the batting and fabric while applying the bias tape, use a narrow zig zag stitch! 🙂 Happy sewing!
Got all my pieces cut and pinned together, but after sewing together all the layers, the jersey pulled so much it was REALLY uneven and bunched up in one section 🙁 So I ripped it all out… will try again.
Any tips for trying to sew through all layers of the fabric without so much stretching? I’m using a knit fabric too, and only 4 layers of batting (that’s what I managed to get out of a queen sized piece). Basically the bottom layer seems to stretch more than the top layer so the edges become really uneven even though the layers are all pinned together.
Oh no! Sorry you are having so much trouble. Are you using a walking foot? I didn’t have one when I did this project, I just pinned a lot and let a few pinches in the fabric slide, but a walking foot would really help. You could also use some fabric adhesive between the layers to hold them together. Also, while I love the knit, it can be harder to sew with. Good luck!
Thanks Jacinda!
So funny because I actually did a google search to look for “tips for sewing with knits” and came across another post you did about that exact topic! So I ordered a walking foot before I even saw your reply 🙂
I was thinking maybe my machine isn’t powerful enough to do this kind of sewing (it’s a beginner Kenmore one). The fabric layers really weren’t moving through well and I was having to almost pull the fabric through to help it feed along, so I’m sure that didn’t help.
I’ll give fabric adhesive a try too though, good idea!
Thanks, Jen
An update – the walking foot worked GREAT. As did pinning all along the line where I was sewing through all the layers.
Thanks for all the help and the great instructions! On to the binding!
That cylindrical shaped knob-like protrusion that sticks straight up out of your sewing machine head directly over your sewing head, is used for tension between your presser foot and the sewing plate-it holds your fabric in place while the dog feed pushes the fabric through and under the needle.
You need to push that knob down in when you sew heavier projects. Release it by pushing the outer ring of it, and it will pop up.
Hope that helps!!
Thank you so much for taking the time to post such detailed instructions! I just finished a mat for my son (Octonauts theme), and he is over the moon. I payed it forward and taught a friend how to sew as she made her son one. Again, you rock! Thanks!!!
Would you be willing to make one if all the supplies were purchased and I could pay for labor? 🙂
[…] two-year old attends Montessori School and sleeps on the nap mat that I made for him using this tutorial. It fits perfectly in the front pocket of my huge new hot pink suitcase and the familiarity helps […]
I am planning to make one of these for my daughter! Maybe I’m missing something in the instructions or I’m just really tired, but why do I need a piece of fabric that is 6 ft long for a preschooler’s nap mat? She’s only 3 1/2 feet tall… I’m stumped.
Hi! You can def adjust the length but I would make it at least 1 foot longer than her current height to accommodate cushion volume and growth. Good luck!
I finished mine!! Thank you for the walking foot recommendation – that made all the difference.
I made mine shorter because that’s the fabric I had – It ended up being about 60″ finished and I started with maybe 68″.
The jersey definitely hides the puckering, but definitely hard because the fabric would stretch as I was sewing, making the quilted lines kind of crooked.
Up close, not so neatly done, but daughter loves it anyway, yay 🙂
Thanks for the help and excellent tutorial!
Which fabric do you think will have the best result, jersey or quilting cotton? Thanks in advance!
love it! fantastic idea
Great idea. I just came back from keeping my granddaughters and was gather things to make her a mat instead of the mattress pad and blanket she had with her Minkie blanket. The parts all work but not too cute. You just saved me a lot of time figuring it out.Good directions.Thanks for the good tutorial. Darling chiled!!!!Vici Fallin
I have been looking for a pattern for one of these. I definitely appreciate your detailed tutorial. I am very excited to try it! Very cute!!!!!!
Love this tutorial, thank you!! Could you post or email me the finished measurements. I’m headed to buy fabric, but want to see if I need to make it larger as my kids are 6 and 9.
Thank you!!
how does the batting hold up in the wash?? We are required to wash their mat pads once a week and Im afraid its going to clump up and become unfortable
[…] http://prudentbaby.com/2010/08/baby-kid/diy-nap-matbed-roll-2/ […]
[…] DIY Nap Mat from Prudent Baby […]
I made two of these for my girls 🙂 I made stretchy elastic things instead of velcro and used blankets I already had for them. And the envelope pillow opening.
http://media-cache-ak0.pinimg.com/originals/01/44/44/014444d29fba0e2b8ab8db3fdfd2b23d.jpg
http://media-cache-ak3.pinimg.com/originals/4b/aa/d0/4baad06efe7df53e61325a14f00467d5.jpg
Here are pics if they work..
Thank you so much for posting this. I can’t wait to show my wife. She’s been looking for something for our daughter who is starting kindergarten this year and this is just perfect!
Haha! “3 year old hoodlums”! You did great – thanks for the tutorial!
I am very glad I found this on Pinterest. I plan on making on right away although I do have a few changes, but only because its for my little one year old who has nowhere to nap at Grandma’s house and other various places. As she is a bit smaller than the average kindergartener, I’m going to make it smaller and with the waterproof PUL fabric. I really hope it turns out as good as yours. Wish me luck!
[…] found this tutorial and it seemed easy enough. I did not put the fleece blanket on the nap mat, but instead just sent a […]
[…] custom swag to send their kids to school in style. Modern Day Memory Keeper made her twins this nap mat with gender neutral […]
[…] started out as an innocent enough project. I had a plan, found fabric that I loved (side not: DO NOT take a toddler and an infant into a fabric store!), […]
I love your “all-n-one” plan-
things are crazy enough without having a separate mat, pillow, blanket, and bungee cord/carrying strap-Absolutely the best!!
Thanks! From my Grandchildren in Advance-I want to start right this second 🙂 Elaine
[…] 1. Many children go to daycare or a caregiver’s home for a few hours or for the workday so I thought you might enjoy seeing this tutorial on making a Nap Mat. Prudent Baby blog had this tutorial several years ago and it’s still available for all who didn’t see it then. Thanks to Prudent Baby for the photo and tutorial I’m using today. Check it out HERE. […]
I was looking for this pattern and found yours by accident! Just wondering, couldn’t I serge the edges of the fleece instead of bias tape? Bias tape is so expensive now!
You can make your own bias tape a lot easier and less expensive. ..make matching tape to your project!
To the prior Pat: I have made this nap mat 3 times now. It is wonderful but, at least in my machine, challenging because of the thickness if the batting. The worst part for me was the bias tape. I would think you should be able to serge it if the serger handles the thickness ok. But the bias tape does give it a nice finished look. if you do decide to use bias tape, I would go up to 1″ instead of the 1/2″ I did that last time and it was much easier. Hope this helps!
Thanks heaps for the easy to follow instructions! Now to whip one up before the little one goes to day care 🙂
[…] DIY napping mat…Mom? […]
Really Awesome idea
Thanks For Sharing
I completed this without any huge problems but I should have used my heavy old singer sewing machine because I had to pull it through when sewing through all that batting. Came out pretty good anyway. I ended up hand stitching a buttonhole stitch on the fleece instead of using bias tape. I just couldn’t see spending the extra money when fleece doesn’t ravel. My step-grandson loves it!
This is a great tutorial! We make childrens nap mat which use the pillow insert but velcro shut on one side to the padding can be removed. This makes them easier to machine wash.
Really? Using Prudent Post’s blog to sell your mats? The huge difference in these and the nap mats using the foam insert is the cushy comfort of these nap mats. They are wonderfully soft and the three I have made have washed and worn wonderfully for several years.
Thanks for this post. I’m a newbie at sewing (i.e. just finished a 6 week beginner class) and I was able to follow your instructions. I made a mickey mouse nap mat for my 3 year old. He’s so excited and I’m happy I was able to make something with love just for him.
Awesome! We’d love to see a picture!
[…] Rollmatratze […]
Have you ever considered becoming a full-time author?
This article was very well written and helpful, as well!
[…] Bedroll Style Nap Mat Tutorial: […]
Hurrah! Finally I got a website from where I know how to genuinely get useful data regarding
my study and knowledge.
[…] DIY Nap Mat […]
[…] you are crafty, Prudent Baby, offers an amazing step-by-step tutorial for making a similar mat with beautiful finishes. This is […]
GREAT TUTORIAL! Your instructions are detailed & thorough. Thanks so much. Pictures help a lot too.
I have now made 2 of these – one for each child (one in 2012 & just finished the 2nd!). The bias tape is my arch nemesis, but I overcame and have successfully completed both of them. Thanks a TON for the easy to follow, picture filled tutorial!!
I had this pattern but lost it in the hurricane do anybody out there have the pattern I would love to make one for my grandson and at the library I can’t print the direction nor the pictures. Thanks to whoever can help me out. I’m willing to pay for it.
This is an awesome tutorial. All of your directions are so clear and the pictures help significantly! Have you ever made these to sell? Would you be upset if someone (me) made a couple of these for an upcoming baby sale?? I always ask first because I never want someone to feel like I “stole” their masterpiece! Make to sell or not, this tutorial was SO helpful and my little will surely be going to preschool with one of these!
Please go ahead and make and sell them! If you can share that you got the pattern from us we always love that. Good Luck! XO
[…] Today’s featured post is a DIY nap mat by the girls at Pretty Prudent. Get this awesome tutorial on their blog DIY Nap Mat/Bed Roll. […]
Bonjour est ce que vous le vendriez ? Si oui combien?
What a wonderful way to make sure nap time is extra snugly, I’m so not ready for my boys to start school but I’m ready for a nap myself ! Thank you for the wonderful tutorial!
Instead of buying expensive quilting fabric, I would use a couple of inexpensive twin sheet. Edges are finished. I have made this but made sections for pillows to be put in for a fluffier pad.
I would love to have this pattern. But for some reason I can not print it out. I can’t even save it to another file so that I can find it back. I am sure my grand daughters would love it.
This Too Cute no to try once or twice.. You being a lefty was a nice touch…
Has anyone added an outside pocket with a zipper to this mat? I’m thinking about adding a pocket with my child’s name embroidered to hold his stuffed animal. Any tips?
Wow.. Finally found Christmas gifts for all the little ones in my life.
Really interesting..thanks for sharing =)
Could I ask where you got your 1.5 inch webbing? I went to Joanns and they carried only 1 inch or 2 inch, no 1.5 inch. And I haven’t seen any of the pretty colors online either.
The binding size suggested is nowhere near big enough. A standard 2&1/4 inch binding used in quilting would be needed. This can be made at home from extra fabric which would save money as store bought binding is expensive. There are tutorials online about making binding strips. The belting can be melted with a flame on the ends to stop it fraying rather than sewn. It’s much easier, quicker & not noticebale at all. I would not recommended trying to hand sew the strips of Velcro on to the mat at the end. It’s extremely difficult trying to push the needle though the hard Velcro but keep it from going through all the layers of the mat as suggested. I would either just machine sew it or scrap the Velcro altogether and use buttons. Just a few suggestions that might help someone wanting to use this tutorial
Just to let your know, when I click on this link from Pinterest it downloaded a virus onto my computer. My virus software caught it immediately. Not sure what you can do about it, but thought you should know!
Well, this is a very honest review of this project. Let me tell you that using a home (domestic) machine in this is a bunch of crap. I have a Bernina 440 and there was no way I could get this even halfway through the throat of my machine even rolling it as the photo portrays, and going from both directions. I had to borrow a machine that had a larger throat, and it was a challenge there too. You really do need an industrial machine to sew this. I am an avid sewer and quilter, and have been sewing for almost 40 years. It is a great concept, but. . . .
Hmm it looks like yur blog ate my first comment
(it was extremely long) so I gueds I’ll just sum it upp what I had written and
say, I’m thoroughly enjoying your blog. I too am an aspiring blog blogger but I’m still new to everything.
Do you have any suggestions for novice blog writers?
I’d definitely appreiate it.
I finally finished it. Our daycare recommended an online vendor bug I thought I could make it cheaper and in less time. That was not the case, I’ve got moderate sewing experience. My biggest issue was wanting it to extra cushiony but my machine couldn’t handle the four layers of batting. I had to split the project in half and sew them separately before sewing it together at the divided sections. My next issue was not being able to machine sew the second side of the bias tape due to its width and I had to hand stitch it. I also should’ve attached the Velcro strap earlier.
It’s darling and I can’t wait for a reason to make another one.
So lovely and beautiful.
Such a Useful information. I am actual blessed to read this article. Thanks for giving us this advantageous information.