


Elisabeth from Growing Home is back with another gorgeous DIY for us. A Rick-Rack Baby Blanket! This is an excellent beginner project, a thoughtful gift and a perfect way to display your favorite fabric in baby’s room. I think I need to make baby Vlad (not his real name) a robot blanket! And if you love this look, also take a peek at Jaime’s Rick-Rack Place Mat tutorial.
And don’t forget, any comment you leave this week could win your that gorgeous fabric up there to the left. Let Elisabeth know how much you love her project, and while you’re at it, let me know how you spell ric(k)-rac(k). The internet seems to be confused and so is Jacinda.
Take it away Elisabeth!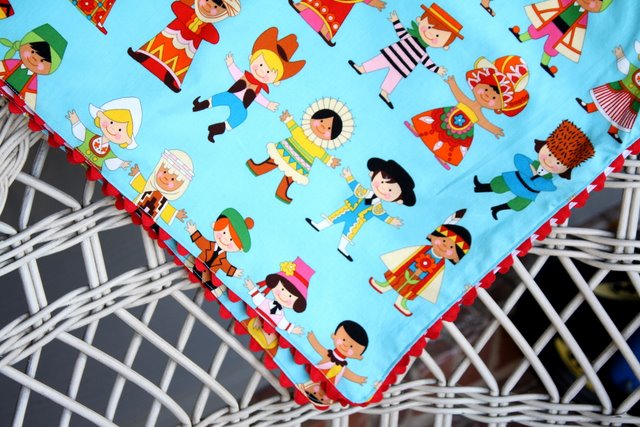
Lately, it seems that conception is in the air. More friends than I can count are having babies, which means that I’m very blessed to have LOTS of baby showers to attend. Now, I love celebrating mommas, love welcoming new little ones, and especially love an excuse to get away from my own responsibilities and chat it up with my girlfriends. However, I get a little bored with my baby gifts. Or maybe not bored, just bummed, because what I WANT to buy my friends is something lovely and unique and surprising (like a hand-knitted mobile from a fun boutique…) and what I can fit into my gift budget is a package of Dr. Brown’s bottles. And honestly, despite the fact that Dr. Brown’s has seen me through two separate years of two separate fussy babies, I would like to have a bonfire and torch all those bottles and their silly parts (I have a weird feeling that I’ve vented about this before…apparently I’m a little angsty on the subject of infant feeding. Don’t get me started on nursing. It was not easy).
Anyway, I have found a solution to my quandry, and it is the DIY receiving blanket.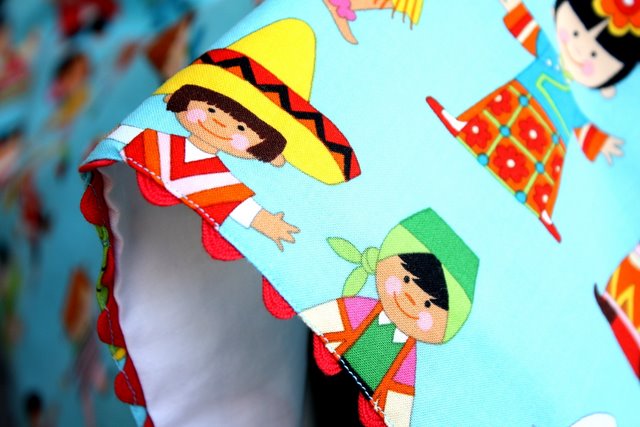
All the credit for this creation goes to my mom, who made collections of these blankets for Big Brother and Little Brother when they were born. Four for each boy, mostly from adorable, preppy, boyish fabrics like seersucker, gingham, and bright Vineyard-Vines-eque plaids. She had the advantage, of course, of knowing that I was having boys, which I don’t always have with friends (as cool as I think it is to wait, I am WAY too much of a control freak to sacrifice all that planning time). If they weren’t meticulously packed away in the attic, I’d show you a picture–it would almost be enough to make me want to have another boy to wrap up in all of them. Almost, but not quite.:)
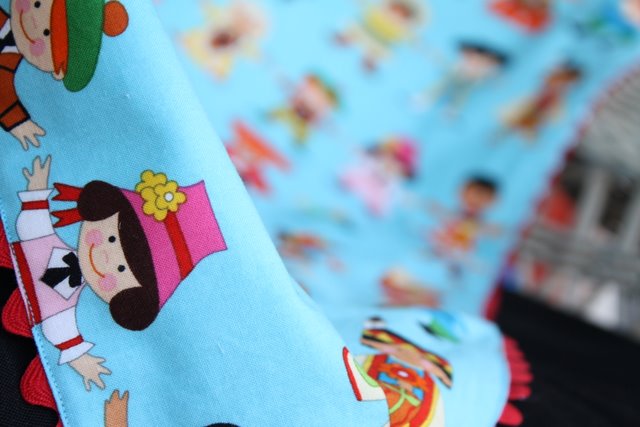
The wonderful thing about these blankets is that you can style them in any way you want, and once you get the hang of it, whipping them out in one evening is quite easy. This bright, funky pattern from Alexander Henry (also available in Pool and Bright) is one I’ve had my eye on for months, and the impending arrival of my dear friend Megan’s third little man was the perfect excuse to snatch it up (I bought it at Whipstitch; if you’re in the Atlanta area and curious at all about sewing, you must go there). Megan’s husband is Czech, and the two of them have spent many seasons of their relationship living and traveling abroad, so this pattern seemed particularly appropriate.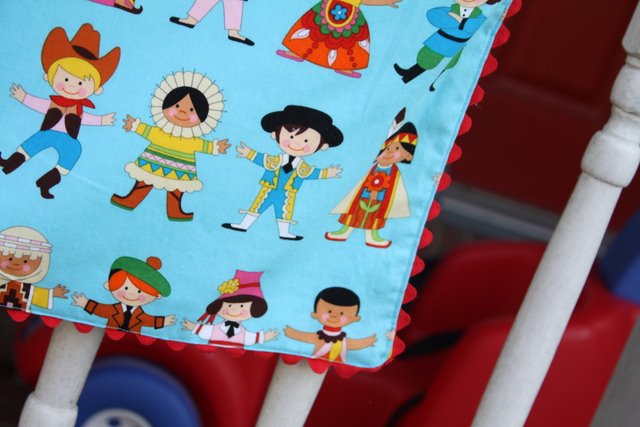
For a another friend–a native Southerner who is waiting to welcome her first child–I aimed for something a little more delicate and traditional.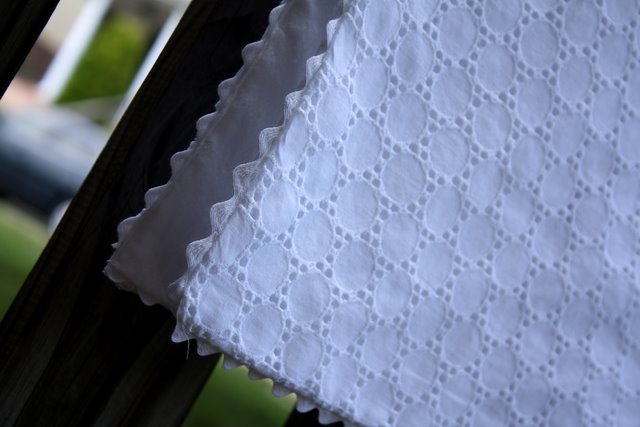
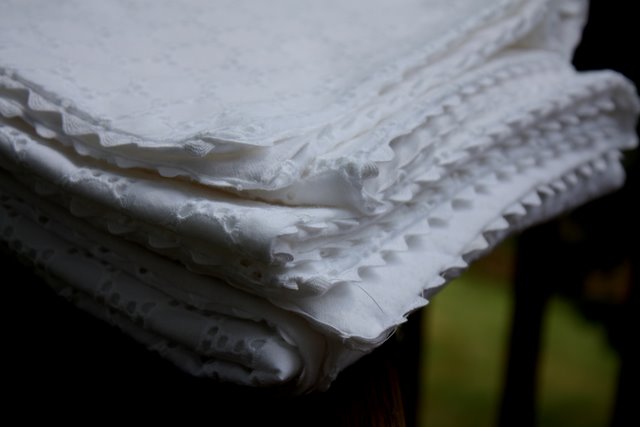
Two totally different looks, huh? The best part is that they are personal, handmade, and FAR more special than something that my meager budget could purchase at Babies R Us. Just don’t hold me to making them for every baby…I might have to give up sleeping.
See the full Rick-Rack Baby Blanket tutorial and tons more pictures after the jump.
Materials
The measurements below assume that you are making a 42″ square blanket. If you would like to go bigger, you’ll need to alter the dimensions accordingly. Just remember that most fabrics are about 43″ wide. (I’m just one mom, but I’d advise against anything smaller–you need the extra material for swaddling).
- 1 and one quarter yard of your fabric of choice.
- 1 and one quarter yard of a backing fabric. I use a high-thread-count cotton sateen for summer babies and white cotton flannel for babies born at any other time of year.
- 5 yards of rick rack. If the baby in question is a girl, you could also try lace or eyelet trim.
- Coordinating thread: one that matches rick rack, one that matches the main fabric.
- Basic sewing supplies
1. Wash and iron your fabric. This REALLY matters with this project because you are sewing two different fabrics together, and if one shrinks significantly after you’ve made the blanket, you’re in trouble.
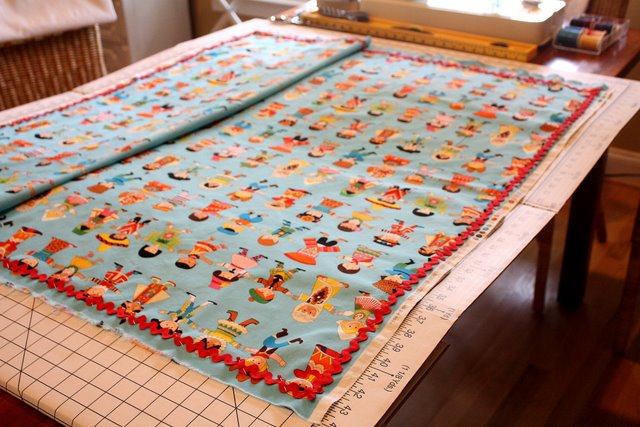
2. Using a cutting board, measure and cut both fabrics to 43″ square (my Alexander Henry fabric ended up being shy of 43″ wide after washing, so I adjusted and made this blanket about 41″).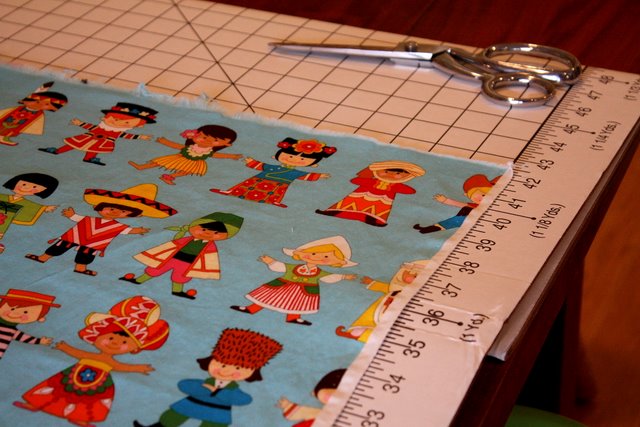
2. Lay rick-rack around the perimeter of your facing fabric square (in my case, the children), one inch from the edge of the fabric. Pin.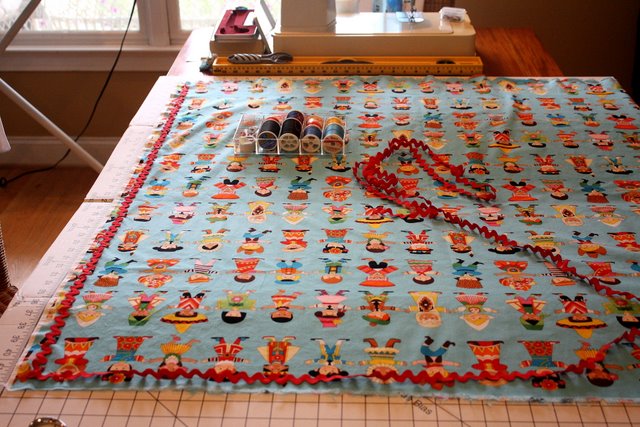
At the corners, fold your rick rack so that it creates a nice, tight, right angle.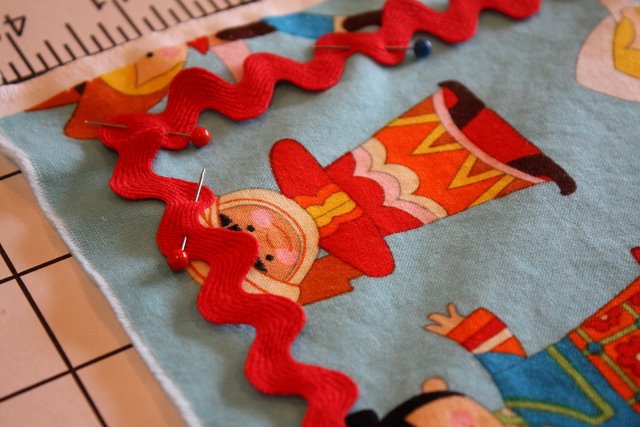
3. “Baste” rick rack to fabric, using a long, straight machine stitch. You want the stitch to be relatively easy to pull out, but precisely placed right down the middle of rick rack. (I used my machine’s basting stitch the first go round and it wasn’t straight enough–the result was a rick rack trim that varied in size over the length of the blanket. No big deal, but not as pretty as it could be).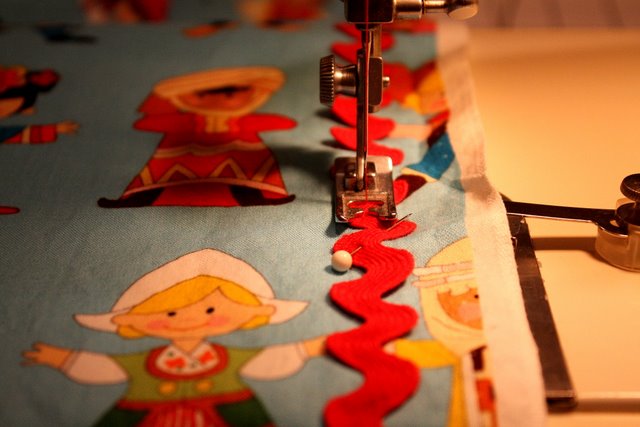
4. Once you’ve basted the rick rack to your fabric all the way around, place your backing fabric on top of facing fabric. The right side of backing fabric should face the rick rack. Edges should be as closely aligned as possible. Pin.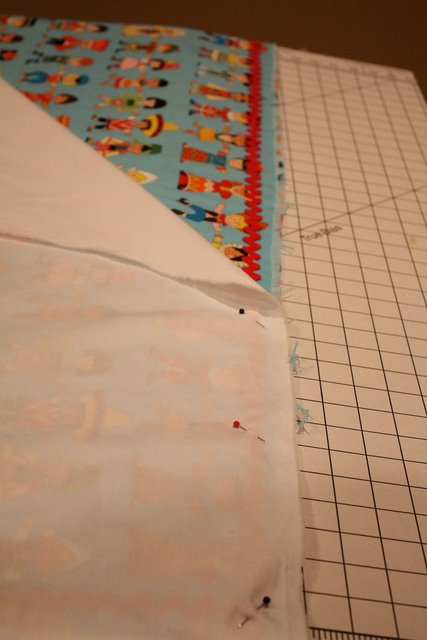

5. Flip the fabric sandwich over and stitch (with a nice, tight stitch this time) over the seam you just basted. STOP about 10 inches from the point where you started, reverse to “lock” the seam, and clip the corners, as well as excess outside the seam (just watch out for your rick rack!). Now, use the gap to turn the whole thing inside out, as if you were making a pillow.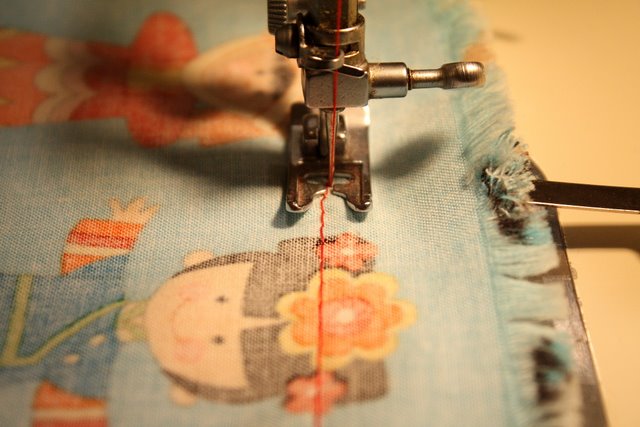
6. Pin the gap together and iron the whole thing so that the blanket is super smooth and the two sides are hanging as evenly as possible.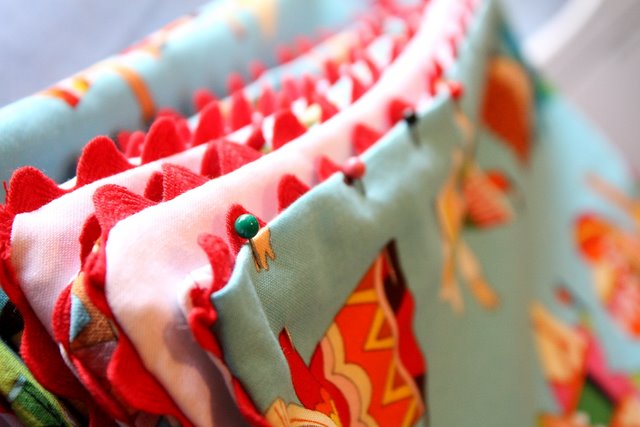

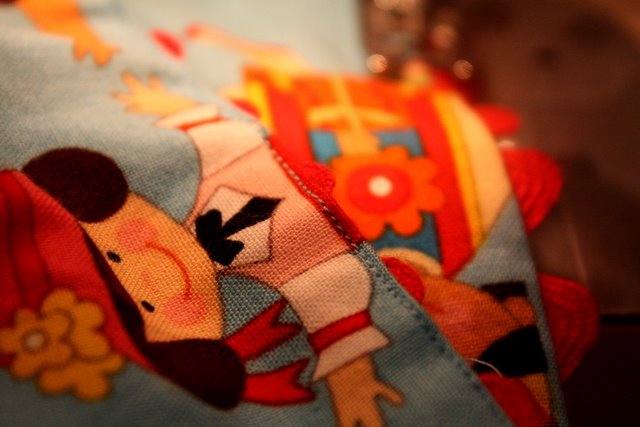
7. Use thread that matches your facing fabric to topstich the blanket all the way around the perimeter. Stay as close as possible to the edge, but make sure that you’re stitching all the way through (I didn’t check this, and my topstitch went through the rick rack in several places–you can see it if you look closely at the finished pictures).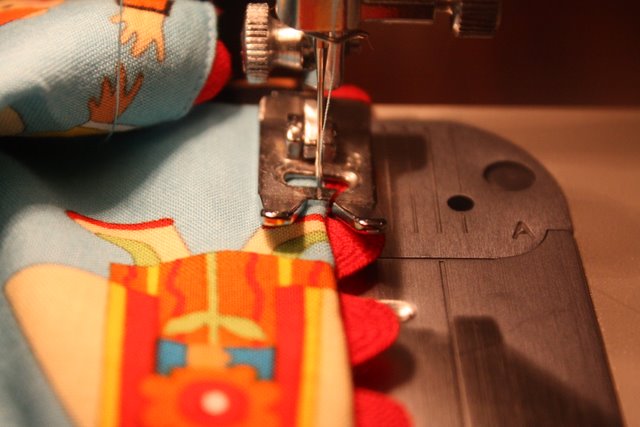
That’s it! One customized, adorable receiving blanket down, many more to go….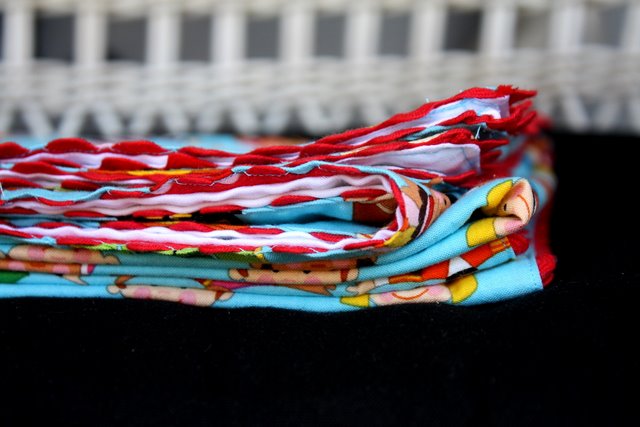
Thanks Elisabeth!
Love it!
I have been wondering how to apply ric-rac (that's how I spell it, just because I think it looks nice that way, sort of French)so that evenly shows through. I really needed your tip about prebasting and then following that same stitch line. Thank you. I also love that fun fabric. Makes you smile.
I love all kinds of fabrics, each one gives inspiration to what it could become…
Ric Rac is so very popular again … love it especially the jumbo look. AND ric rac can be held in place nicely with dots of Elmer's Washable School Glue. Elmer's is the best friend a sewist/quilter can have nowdays.
Darling fabrics … gonna make some for my own brand new GD born in July. Thanks.
i spell it ric rac. the second blanket is so beautuful. your friend is lucky to have you.
I too, have a gaggle of pregnant friends, and equally, a gaggle of baby showers to attend. I will have to make these… im not sure what the point is of basting though… why not just stitch it for real the first time?
That's super cute, but now I have "It's a Small World After All" stuck in my head!
I absolutely ADORE the fabric you used with the kids on it. It makes me think of "It's a Small World After All", too. I am needing to make some baby gifts and was tired of the same ol' flannel receiving blankets. Thanks for sharing this!!!
Amazing tutorial, thanks for sharing and thanks Elisabeth! I'm going to have to try this one out…i think ric rac looks cuter spelt with the c 🙂
I also love your robots fabric choice! An amazing print for a baby or a child, plus i love those shades of blue and green.
So adorable! I sometimes don't love the look of ric-rac, but this blanket is just perfect. Now I just have to decide what fabric to use when I tackle this for my friends new baby 🙂
First of all, I absolutely love your blog! Secondly, I love love love this tutorial. Perfect timing for me. I've been meaning to make a rick rack baby blanket for some time. I have the material cut out just waiting to be sewn. I was planning on winging out and hoping for the best, but now I don't have to. I can follow this tutorial! Thank you so much! Hoping to get this done this week!
I love it! Beautiful outcome for this project, would be super sweet gift – And what a cute fabric!!
Thanks for this =)
p.s
I'd go for ric-rac 😉
Those are fantastic. I am definetly going to to be making some of these for a friend.
Oh My how I just love those! The do look very different from each other. I love the bright colors yet I really like the white one!! Thanks for the tutorial!!
I would say ric rac too. :0)
Angie
these are absolutely adorable. such an easy gift to make for babies. thanks for the tute!
I'm so glad that you all like this! Jessica, the point of the basting is to make sure you get the ric-rac (I like that spelling better, too:))straight. It doesn't look nearly as cute if it's uneven all around the blanket. Then again, I'm a beginning sewist, so if you can get it right without basting, more power to you!
great blankets!
thanks for the tutorial!
LOVE the white fabric you used in the classic blanket…where did you get it?
Sweet blanket! I too have a million pregnant friends right now and am getting tired of my standard gift of knitted booties. They get boring after you make a few pairs. I might have to give this one a go! I really like the eyelet blanket you made. Thanks for the tutorial!
oh dang it, everytime I use ric-rac (that's how I speel it) I can't make it look nice and even. So this tutorial is great. And I'd LOOOVEEE to get that cute fabric and make something cute for my girl.
xoxo
Rebeca
Elisabeth… I am as wet behind the ears as it comes for newbie sewpeople (hehe)
thanks for the info. i wouldve probably skipped that step and then learned the hard way 🙂
Great tutorial! I am definitely going to give this a go.
Nice simple idea!
Hi all, I got the eyelet fabric at an Atlanta store called Gail K Fabrics, but just found this look-a-like online (and it's cheaper!). http://www.onlinefabricstore.net/eyelet-fabric/white-eyelet-fabric-circle-design-.htm
Yay, I can't wait to try this out! I'm pregnant and due in October. Pregnant and due along with my 2 closest friends, my hairdresser, and my mom's co-worker's daughter. Yep, all due in October and ALL having girls. This is a great personalized gift and an easy one at that. Plus I have 2 yards to Alexander Henry cupcake fabric that I "had" to have but have yet to make anything with….
Oh man, I hear you about having a million pregnant friends. Thing is, in my world I'm the one who's still trying with no luck. I've been reading this blog and a few others for nearly two years now, and making all sorts of baby crafts that I'm storing up in the armoir I used as a child. I'd like to think G-d's giving me enough time before we conceive to make a nursery full of homemade blankets, toys and clothes. I'll make a few of these as well to pass the time 🙂
I love both of them! Great work!
I simple love the eyelit white with ric rac. Beautiful. Something about eyelit that is so feminine and sweet. Love it!
Simple – yet brilliant! Love it.
BTW I spell it ric-rac 😉
Love the glue tip in comments also never thought of basting it on first, last time I tried ric-rac I got too annoyed with the pins.
Love it! Handmade gifts at showers are loved by everyone, not just the mama.
Love the blankets! Especially the southern one. Guess that means I'm a southern girl! And I agree, handmade is so much better!
Oh I spell it rick-rack!
Hugs,
Gina
This is really cute. A great idea! I love giving hand made gifts.
I love it! I was so inspired by this gift idea that I went and bought the materials yesterday, as soon as I got home I washed the fabric up dried it, and went straight to work creating the beautiful gift. I selected a beautiful eyelet material and white flannel with white rick-rack. The final project was beautiful! I would suggest sewing a few stiches in at least 4 spots to hold the blanket together. Thank you for sharing those GREAT ideas!
jumbo ric rac is like finding money in your coat pocket in the fall after a long summer… a DELIGHTFUL surprise and can't wait to use it!!!!!!!!!!!!!!!!!
i make these too! anything with ric-rac rocks. that's how i spell it ric-rac. and what's the deal with selvage vs. selvedge? which is it?
So i LOVE your site…I'm new to sewing and a mama of 2 little girls so i am obsessively searching for easy sewing projects for babies and girls and your site has so many cute ideas! Tonight i made my first rick rack baby blanket and it turned out really well….okay so maybe i am not about to post a pic of it or anything but hay…it is my first sewing project EVER and i am so excited about many more to come. Sewing bliss here i come….
Love this project! What type of fabric did you use for the backing?
I use a high-thread-count cotton sateen for summer babies and white cotton flannel for babies born at any other time of year.
PLEASE, PLEASE, PLEASE tell me where I can get this fabric?!?!?
I’m referring to the multicultural fabric here in the photos above. I’ve just discovered this website and loving it so far! Thank you!
Where did you get the cutting board you’re using in the photos?? It looks so practical.
Just a question…what do you do with the ends? Maybe I missed something but it seems that the ends of the ric rac should be tucked inside??
Thanks for helping me as I made my greatgrandson to be a white trimmed in blue ric-rack baby receiving blanket. Turned out very nice altho the
corners can be a chore but when finished looked fine. Thanks, Annette
Great tutorial! I personally love the fabric you chose and my kids would love them too. 🙂
Anyway, are you looking for the best fabric material to use in your home? It is important that you first understand the difference amid treated and inherent fire-resistant fabrics. Besides, you may also want to know the building blocks of the matter in flame retardant fabrics. You can learn more as you check this site -> http://fr-one.com/