


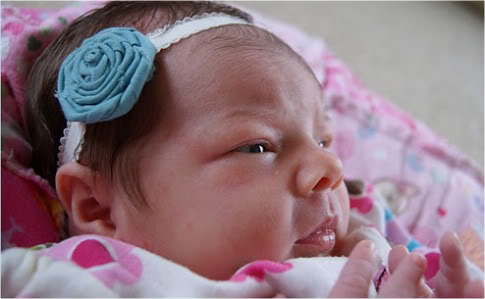
Look at that so-cute-I-could-cry baby headband! I came across this picture at Post Road Vintage while surfing the web. She made the headband using an adorable no-sew Rolled Fabric Flower tutorial she found at My Sparkle. I asked the tute author, Danielle, to share the how-to with us so we could all make adorable baby headbands too!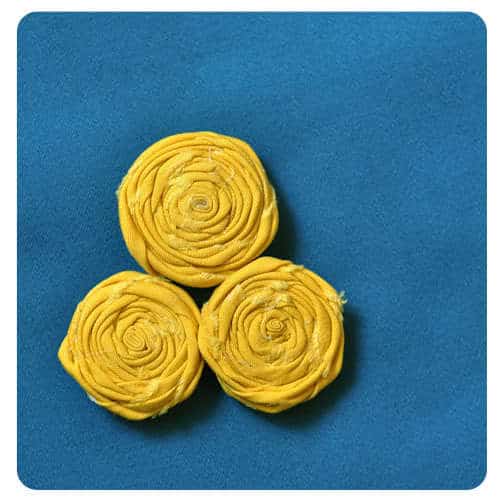
Take it away Danielle from My Sparkle…
So I am jumping on the bandwagon and loving all the rolled fabric flowers I’ve seen here and there. We decided to make some with the girls in our church youth group, but I couldn’t find a great tutorial on how to make them so I played around and this is what I came up with. Enjoy!
Get the full Rolled Fabric Flower Tutorial after the jump…
And remember, leave a comment on this or any post this week and you could win that pretty Alexander Henry fat quarter.
How to Make Rolled Fabric Flowers
Start with about a 1″ ripped strip of fabric (you can use any width…this was the width I liked best). The length and weight of your fabric will dictate the end diameter of your flower.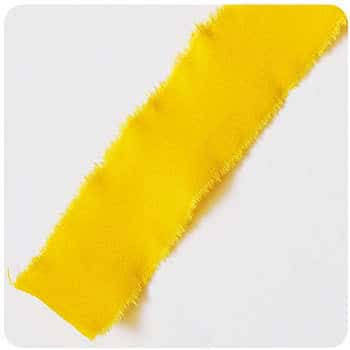
Fold the strip in half and dot a little fabric glue on the end 1/2″ or so.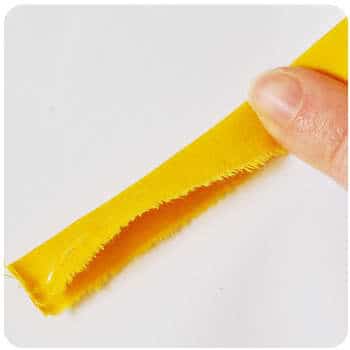
Roll the glued end a few times to get a nice tight center.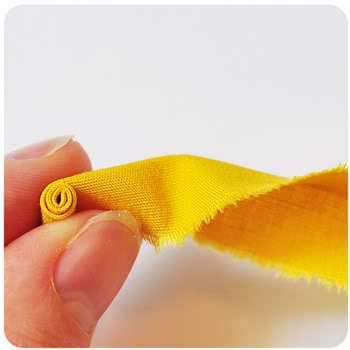
Then, once you have a center you like, start twist/folding your fabric away from the center as you roll.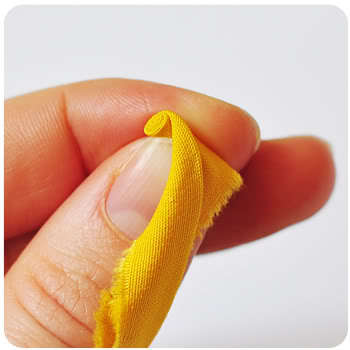
It will start to look like this. Periodically secure the layers with fabric glue as you go.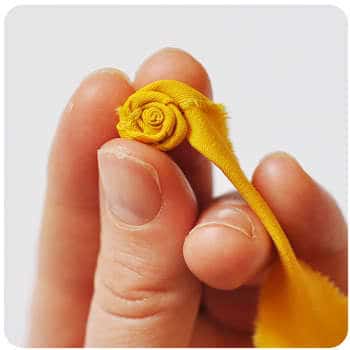
Continue rolling until you have a flower that is sized the way you like, but make sure you leave at least a 1″ or 2″ tail (enough to cover flower bottom).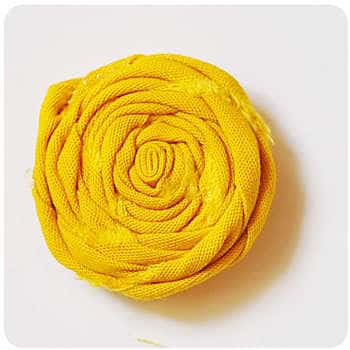
Spread glue all over the bottom side of the flower.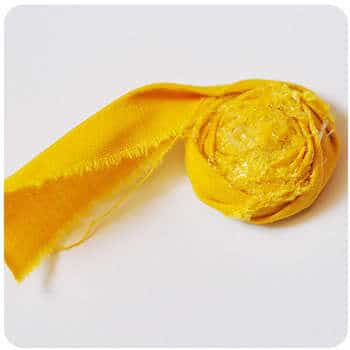
Then fold tail down to cover glue. Press flat with your fingers.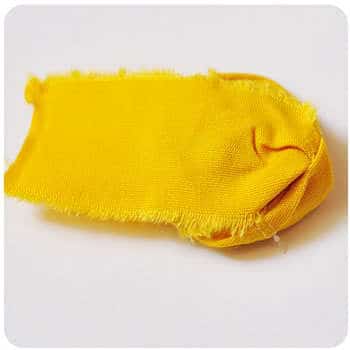
Then trim off the excess fabric.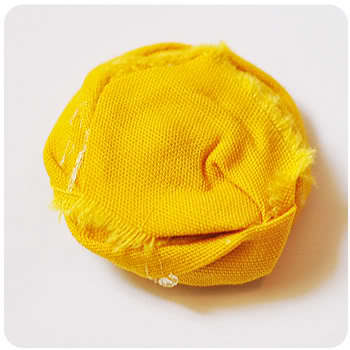
Done!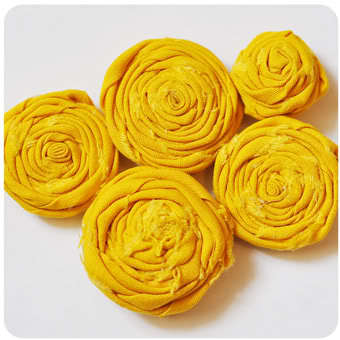
This would be another great use for some of the fancy elastic you gifted me for my birthday. Oh wait, I'm having a boy! What am I going to do with a boy? So confusing.
AWESOME! Thank you!!!
I love that I don't have to sew it! Thank you! Becky*
Jacinda… you're having a boy! I know the feeling, I have a 10 month old boy and a 2 and 10 months old boy. somehow, we managed to have them on the same day, just two years apart.
boy clothes and accessories are just not as fun as girls… but they sure do look cute in a tuxedo shirt onesie 🙂 maybe you could make one of those! (i bought mine)
This is the easiest, cuty-est, yummy-est thing I've ever seen. (yes, I said cuty-est)
I'll be making like 7 today
those are darling! and i love the yelllow!
embily@gmail.com
This could become addictive!
I'm feeling a brooch coming on, or perhaps a hair doo-dad for me!
How do you tear the fabric?
I love these fabric flowers! Thanks for the tutorial, I know what I'll be doing this afternoon!!
This makes me wish I had a baby girl. 🙁 Maybe I can make a sweater completely covered in them!!! ugh… on second thought… maybe I can just make a headband for a friend that has a baby girl….hmmm
Thank you so much! I've been looking for the perfect tutorial for me and this is it! I bought fabric to make this but just wasn't finding what I wanted but this is def. it.
I cannot wait to make one of these for my little girl!
Wow! So cute! If only my little girl would actually wear a headband I would make one for her.
I have 2 boys Jacinda – so I totally understand! It's hard finding things to make for them to sate my creative appetite. Hey, Maybe you will come up with something totoally amazing and those of us who have boys will go "Wow! Why didn't I think of that!" lol.
As much as I love the headband – I have to wonder at putting something on the baby's head that could put pressure on their fontenelles… Any advice out there?
I buy toddler or sometimes adult headbands for my babygirl when im not making them. They fit but arent tight and allow her to wear them longer instead of always having to buy bigger ones as she grows! 🙂 plus her PED said its not too much pressure on her fontanelles, I had the same concern =)
Please email me instructions on the making of the headband – length etc. And attaching the flowers
Thanks so much for the flower tutorial. Carol
This is such a great tutorial! I've read a few of them and this one is definitely a 5 star!
….that sounded a little odd—thought I'd clarify—-that I've read a few other tutorials on the rolled flowers from various sites….yours is absolutely great!!
I love making these:) I think my daughter has about 20 of them since I use the scraps from all my sewing projects for them! I attach hers to clips or headbands:)
This is perfect! love it!
Love! I have a bunch of scraps that will work out!! Thanks!!
What a great way to use scraps…thanks for the how-to!
Neat tutorial! My cousin is having a baby shower in a few days! I need to get busy making some headbands for her new baby!
Thank you so much for the tutorial! Me and my husband were both bald babies until we were 1 or older…unfortunately our daughter has the same gene! Well-meaning but confused people tend to think that no hair means we have a boy (despite the pink shirt she is wearing)…Now we can just stick these beautiful flowers on headbands, on her clothes, on her stroller, you name it… and give her that girly look that will be sure to draw compliments! Can't wait to make one in every color!
so i love these flowers soooo much, i got out my scraps and a glue gun. i am now sporting two dora bandaids and a hello kitty on my wounded fingers. why can't i use a glue gun without burning the crap out of myself???
Love them! I am off to make about a million of them from all of my scrap.
Oooh! I don't have a little girl but I could make this into a head band for ME! How cute!
A baby flower headband – no way! This is all for ME!! Love it!!!
Actually, my niece loves to wear pretty stuff in her hair, she's a big fan of hair accessories. Anyway, these flowers are beautiful. I would love to make something like these for my niece. Thank you so much for sharing this tutorial. 🙂
It is beautiful! I will be making one for me for sure! Thank you for sharing.
Isn't she the cutest baby ever?? ok so I admit I may be a little biased.. she is my first girl after three boys- I'm so excited to finally have a girl to sew for and "doll up" 🙂
Great blog btw.. I will be following 🙂
what kind of fabric was used for this tutorial?
I really see a headband in my future and the trim on my friends christmas dress for her daughter!
I love fabric flowers and this was one of the types I was looking for a tut for. thanks!
Stopping by to show some love from a new fan!
Check out my Etsy shop at:
http://www.etsy.com/shop/DoodleboopDesigns
This is perfect! I am a proud aunt of a 3 week old, and want to start making headbands ASAP! One problem – where I can I get the actual band? I like the one in the photo bcause it isn't plain elastic, but it's also not to frilly. Any tips? Thanks!
Very cute! ~Heidi
Hi this tutorial is great I have tried making rolled up flowers but wasn't looking good but the way these are done is fantastic.Here are some of my flower headbands I made.Thank you
I love this!
I'm launching my first linky party next tuesday. It's for projects that cost less than $10 and take less than 20-30 minutes. Would you consider linking up with me on my first linky party endeavor? Thanks!
http://sweetfloweret.blogspot.com
Tina
Thanks for the tutorial, I've made at least 10 of them now. They are beautiful and are ready to be put on a ring blank and sold. Thanks again!
Thanks a lot for the tutorial. I share it in my blog and link it back to you here http://krasart.com/?p=331
I absolutely love these!
Im new to crafting and im looking forward to making these!
So I am loving your rolled flower and trying hard to make one but mine keep coming out looking like rosettes… while very pretty its not the desired result lol.
These are not easy at 1st but get easier the more you do.
I love this amazing!! Im so happy I found this DIY bow and NO SEW thats awsome . Thank you so much : )
Thankyou SOOOO much!! These are amazing and the directions are very clear and easy to follow!!
I just made my first one of these last week! So easy and adorable! Where did you get the bands from?
[…] The flowers that I made came from a different blog I found on pinterest, here is that link. […]
Thank you so much! I have been looking for the perfect tutorial for this and this is it! So “no-sew” easy!! Thanks bunches!!
These are the cutest – I have an obsession issue w/fabric flowers!
I’ve included the link to a short list of favorite fabric flowers here: http://twotendesigns.blogspot.com/2012/06/make-it-monday-summer-wreath.html#
Thanks for sharing them!!
Kim
I am going to try this! I’d also like to know how to rip the fabric?
Hi Thanks for the photos, just gave it a try! 🙂
[…] No-Sew Rolled Flower Headband for Newborns […]
I like your finish, much neater than wha I had figuredout
If I want a bud I tied a liise knot at the start. A big one
with some feathers maybe on a hair clip–I wonder?
[…] Don’t you just love this rolled fabric flower from Prudent Baby: […]
This is def. the best method I’ve tried! Thanks for the tutorial!
I must find my glue gun.. this is adorable!
I love this tutorial! I can’t wait to give it a try! I am posting a link to this tutorial tomorrow on a post about scarves! Please come by and check it out! Thank you for writing this fantastic tutorial!
Helen
Blue Eyed Beauty Blog
I just joined pintrest after resisting for a yr and I want to say THANK YOU THANK YOU so much for publishing this tutorial. I have search for 2 yrs oto find a good rolled flower tutorial and now I found it so thank you so much again.
[…] Inspirations & Tutorials Guestbook – Suzy Shoppe Pens – BridalWeddingHangars Bow tie – Paper & Stitch Fabric rose – Prudent Baby […]
[…] Inspirations & Tutorials Guestbook – Suzy Shoppe Pens – BridalWeddingHangars Bow tie – Paper & Stitch Fabric rose – Prudent Baby […]
Oh my god ! I was looking for this tutorial for so long 🙂 Thanks a ttoooon for this awesome post.
This number will vary greatly among bettors, change with time and move with wins and loses as well as strengths of picks.
is proving to be a safe, secure, customer-friendly, billion-dollar industry, complete with.
Before you begin playing or putting money
on wagers, calculate the amount of money you can afford to spend on sports
betting.
[…] prudentbaby This entry was posted in Travaux manuels and tagged fleurs du tissu, fleurs du tissu […]
For instance an umbrella stroller is tthe easiest to travel with because
it folds uup small enough to carry on one arm. Each baby stroller offers features, which may or may not be suitable for you,
so when you buy your stroller, keep iin mind how aand where you are going to use it
and you won’t go far wrong. Baby – Center Medical Advisory Board, “Heat Stroke,” Baby – Center.
[…] and this {and I have a tutorial to make one out of cuddle fabric here}, but I seriously want to try these really tight ones, maybe […]
[…] have to thank the ladies at Pretty Prudent for the fabric flowers idea . Here’s what I did to make […]
[…] the rosette necklaces that I made. I have been so inspired by statement necklaces lately, and saw this tutorial for fabric rosettes (which I bookmarked ages ago, because they were just so darn […]
Amazing way to make the baby’s headband flower this look awesome on cute babies…
Thank you, thank you! 🙂 This was just what I needed to cover up a tiny faux-pas on a clutch I made for a colleague. Now it looks even more festive.
OMG simply adorable! 🙂 Great job! Jen @ http://www.sweetbabybowtique.com
I am trying to start up my own blog and I learned how to make these flowers off your website a while ago. The post I am doing is a Shabby Chic Wreath using these flowers and burlap flowers. I thought that I should get your permission first before doing my own tutorial on them at my blog. I will make sure to give you full credit for the roses during the post as well.
Would that be ok?
[…] ce headband que je m’étais fabriqué, – Pour la fleur pastel, j’ai utilisé ce tuto, – Pour la fleur rouge et violette, j’ai utilisé ce tissus et ce tuto J’ai cousu […]
Great tutorial. Today I tried making these flowers with my kids and it was super fun. Thanks for sharing.
Needed a decoration for a wallet I was making and this worked amazing. Thanks so much!